Today it’s all about personalization. Imagine having a virtual assistant who knows your website inside out, can answer your visitors questions and in your tone. That’s exactly what we’re going to do together in this step by step guide.
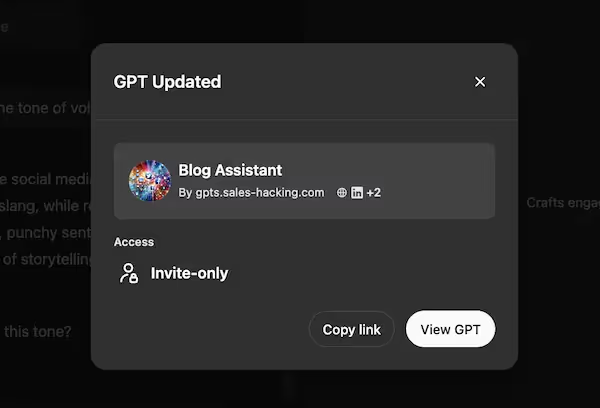
Whether you’re a beginner entrepreneur or a seasoned digital marketer, this tutorial will walk you through the process of creating a GPT personalized, powered by content from your own website. We’ll break it down each step by step, from extracting your content to setting up your AI assistant on the OpenAI platform.
Let’s get started.
Step by Step Guide to Creating a Custom GPT
Step 1: Extract Content from the Website with Chrome
Extracting content from your website is the foundation of your custom GPT. This step requires precision and attention to detail.
Open up Google Chrome and go to a page on your site. Choose this page wisely as it will be the template for extracting content from across your site.
Once on the page, right click on the main text and select “Inspect”. A world of HTML code will open up in front of you, don’t be scared! Your mission is to find the section that contains the meat of your content.
Look for tags like <article>, <div>, or <section> that contain the main text. Use your mouse to hover over different parts of the code and see which sections of the page get highlighted. It’s like a digital detective game!
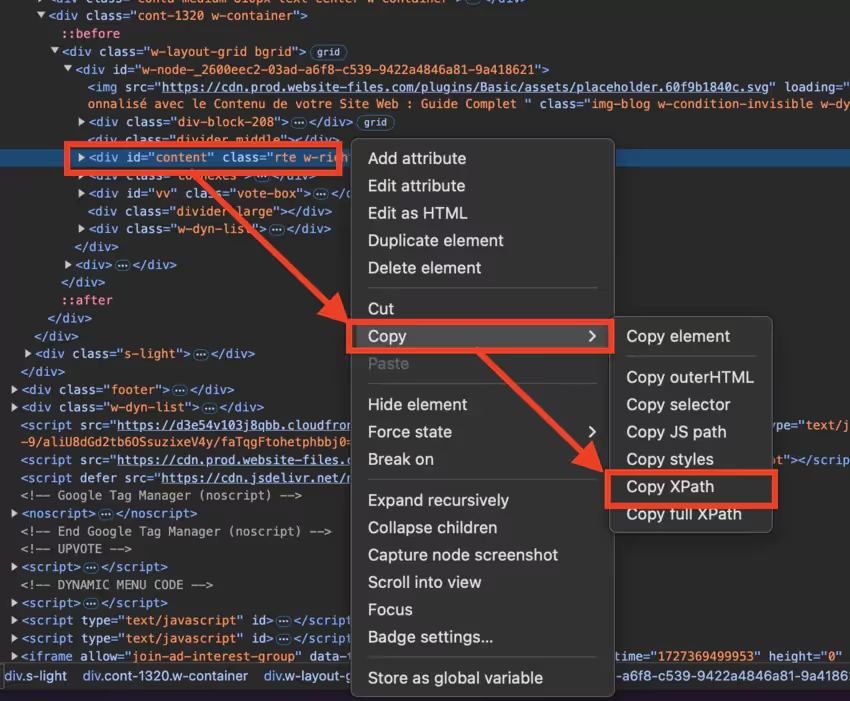
Once you’ve found the right section, right click on it in the inspection panel, hover over “Copy” then select “Copy XPath”. This XPath is like a map that will guide our extraction tool to the content on your site.
For sites with lots of dynamic elements, you might need to refine your XPath. Go ahead and experiment to get exactly the content you want to include in your GPT.
Step 2: Set Up Screaming Frog for Extraction
Now that you have your XPath, it’s time to set up Screaming Frog SEO Spider, your sidekick in this content extraction adventure.
Download and install Screaming Frog from their website. Once installed, launch the SEO software and get ready to dive into the world of data extraction.
In the Screaming Frog interface, go to”Setup“>”Custom“>”Extraction“. This is where the magic happens. Click “Add” to create a new extraction rule and give it a name like “Main Content Extraction”.
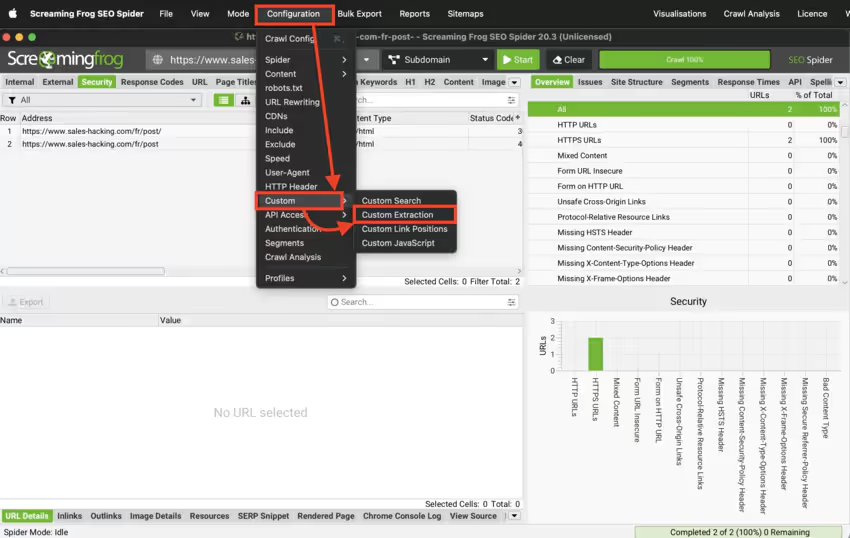
Here’s what to fill in:
- Extraction method : “XPath”
- Rule : Paste the XPath you copied from Chrome.
- Filter : “Extract Text” to get text content only.
Don’t forget to save by clicking “OK”. You’ve just set your net to catch the content of your site!
If your site has different types of pages (Blog, products, etc.) consider creating multiple extraction rules to get every detail of your content.
If you’re comfortable (and you don’t have thousands of URLs) this can be replaced by IMPORT.XML of Google Sheets + REGEX
Step 3: Start Analysis and Export Data
Now that Screaming Frog is set up, you’re ready to start analyzing your site. This step is like throwing a stone into the ocean of your web content and seeing what comes back.
Enter your site URL into the Screaming Frog search bar. Take a deep breath and click “Start”.
Screaming Frog will then go through your site page by page applying the extraction rule you set up.
Once the analysis is done, it’s time to harvest your fruits. Go to”Internal“, then select”HTML“to see all pages with text. Then go to “Custom Extraction” and select the rule you created.

To export your data:
- Click “Bulk Export”
- Select “Custom Extraction”
- Select “All”
- Choose the columns (URL, Title, Extracted Content)
- Click “Export” and save as CSV
Tip: Use Screaming Frog filters to narrow down your results. For example, you can filter only blog pages or product pages if that’s what’s relevant to your GPT.
Step 4: Convert CSV to PDF (Optional but Recommended)
Converting your CSV to PDF is an optional step but highly recommended. It may seem unnecessary at first but it’s a crucial step for OpenAI.
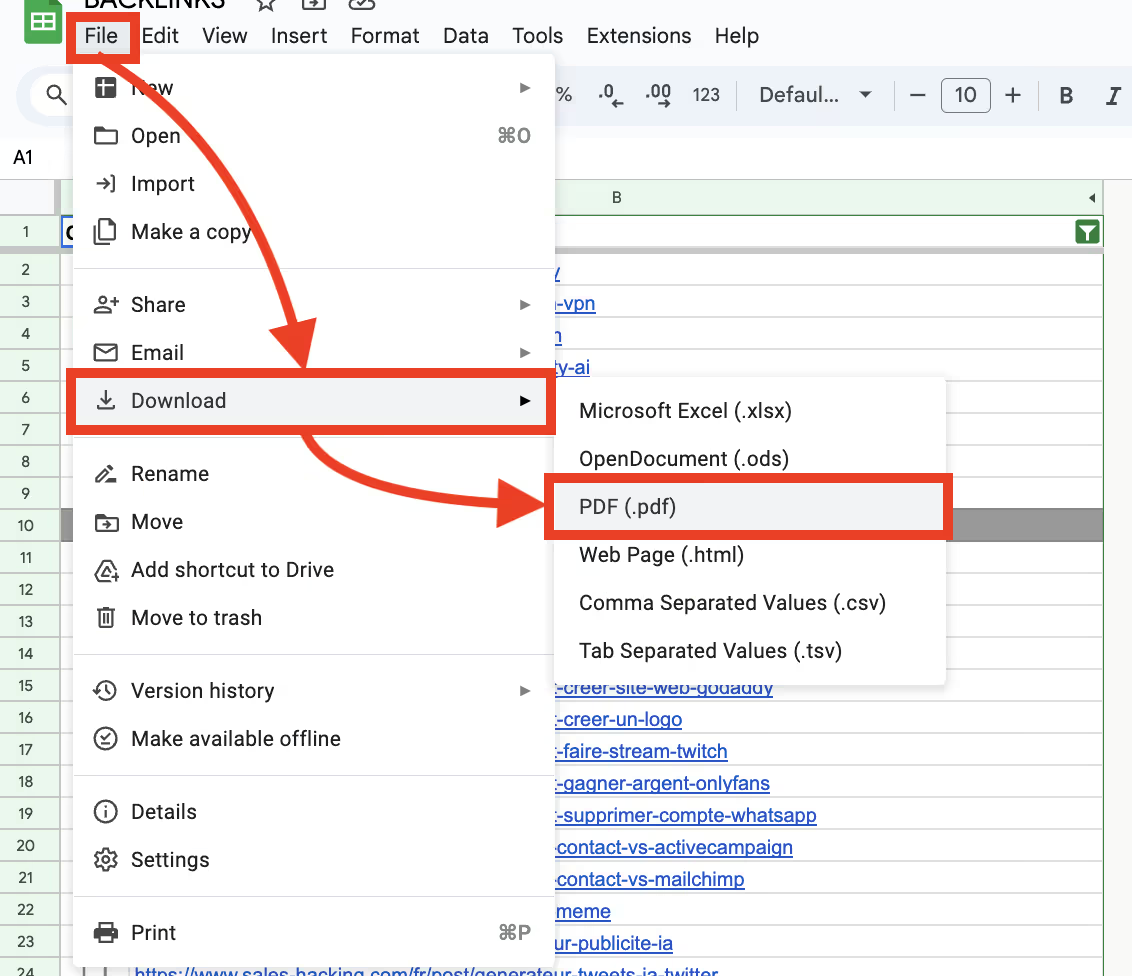
Open your freshly exported CSV file in Microsoft Excel or Google Sheets. Let’s give your data a tidy:
- Adjust column widths for better readability
- Remove unnecessary columns that don’t contain important info
- Make sure formatting is consistent throughout the document
Now that your file is tidy, it’s time to turn it into a PDF. This is like wrapping a gift: it makes your content more presentable and easier for the OpenAI system to consume.
To convert to PDF:
- In Excel: Go to”File“>”Save as“and choose PDF as the file format.
- In Google Sheets: Click on”File“>”Download“>”PDF document“.
Why PDF? PDF files are generally better for OpenAI. They preserve the formatting and structure of your data so your content is better integrated and understood by AI.
Step 5: Create Your Custom GPT on OpenAI
You’re now at the final and most fun stage: creating your custom GPT on the OpenAI platform. This is where your content comes alive as AI.
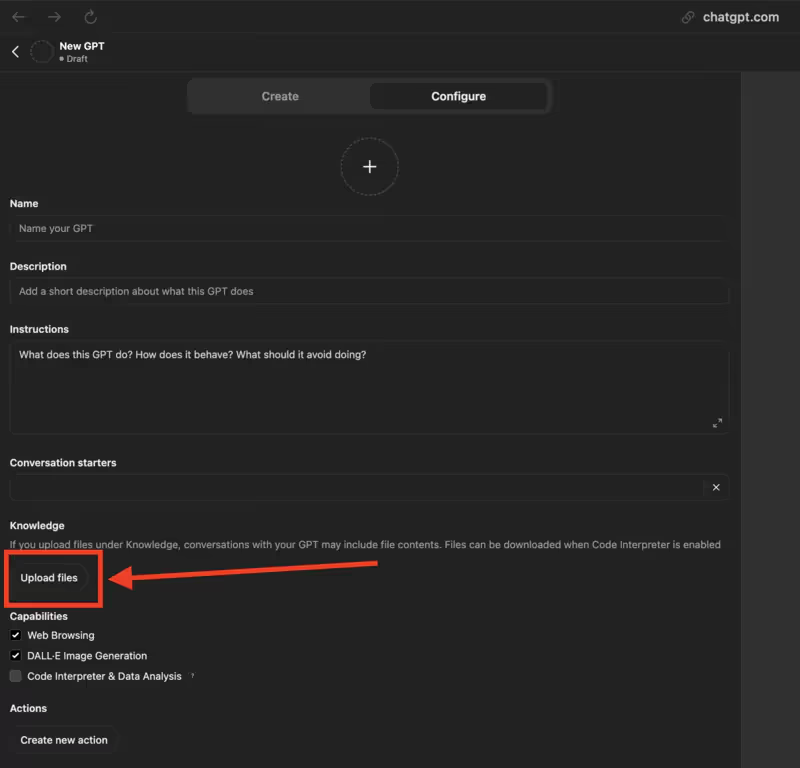
Go to chat.openai.com and log in to your account. Once on the dashboard, find the “Explore GPTs” in the sidebar and click on it. Then click “Create a GPT” to start.
- Name: Choose a name that’s catchy and descriptive for your assistant.
- Description: Briefly explain what your GPT can do and why it’s unique.
- Instructions: This is the most important part. Tell the GPT how to use the content you’re about to provide. Be specific.
- Upload your content: In the “Knowledge” section, click on “Upload Files” and upload the PDF you prepared. This is where all your extraction work pays off.
- Test and refine: Once set up, ask your GPT various questions to test its accuracy and relevance. You can adjust the instructions or reupload the content if needed.
Pro tip: The key to a good GPT is your instructions. Be specific about how you want AI to use your content. For example, you can ask them to always quote the exact source of the information in their responses.
Remember creating a custom GPT is an iterative process. Test, gather feedback and refine over time. With time and practice you’ll have an AI assistant that’s aligned with your brand and content.
FAQ
Do I need programming skills to create a custom GPT?
No, this guide is for beginners with no advanced programming skills.
How long does it take to create a custom GPT?
It can take a few hours to several days depending on your site size and your tool familiarity.
Can the custom GPT evolve and improve over time?
Yes, you can update your GPT with new info to improve its performance.
How much does it cost to create a custom GPT?
Costs vary depending on the tools you choose and the scope of your project but there are affordable options to get started.
Conclusion
Creating a GPT based on your website content is a big step in online optimization. This guide has given you the tools and knowledge to turn your site into a smart virtual assistant that can interact with your visitors in a personalized and effective way.
By following these steps you not only improved your site user experience but also opened up new opportunities for customer engagement and service. Your custom GPT is now ready to answer questions, provide accurate info and represent your brand 24/7.
Remember your GPT is just the beginning. Continue to fine tune and update your model with new info to keep it relevant and useful. With this tool at your disposal you’re well ahead of the digital curve and can deliver value to your visitors.
.svg)


