You are looking to generate a maximum of qualified B2B leads on LinkedIn without spending your days there ?
We will see how to set up highly targeted campaigns and manage your interactions automatically and securely.
Follow this step-by-step guide to discover how to exploit the full potential of the tool and boost your lead generation like never before.
Let's go!
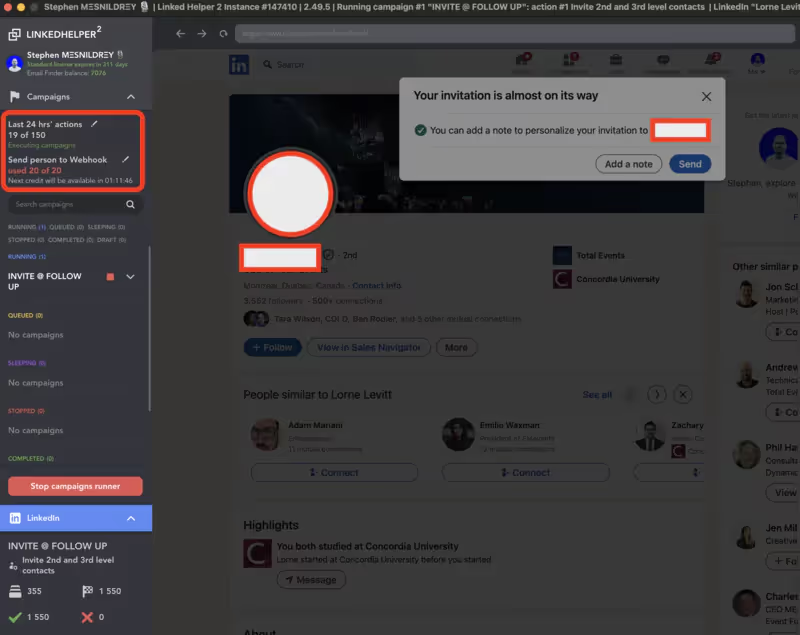
Benefits for your Social Selling
If you've ever tried to do business development on LinkedIn, you know how time-consuming it is. Between looking for prospects, personalized messages, and managing responses, it's hard to scale up.
That's where Linked Helper 2 Change everything. Here is what this new generation tool allows you:
- Build lists of hyper-targeted prospects using advanced filters (function, company, location, keywords...)
- Create automated engagement sequences to contact, relaunch, and convert your targets
- Automatically find the email addresses of your prospects thanks to the integrated tool
- Connect Linked Helper 2 to your emailing tool like Woodpecker with Make to launch cold email campaigns in parallel
- Keep an eye on the KPIs of your campaigns in real time to optimize continuously
Follow this step-by-step guide to find out how to exploit the full potential of the tool and boost your pipeline like never before.
Ready to receive a shower of LinkedIn leads on your CRM software and email campaigns?
Let's go!
Step-by-Step Guide
1. Create your Linked Helper 2 account
Before you can take advantage of the power of Linked Helper 2, you need to create your account.
.avif)
Here's how to do it:
- Go to the official Linked Helper 2 website: https://www.linkedhelper.com/
- Click on the” buttonFREE TRIAL“or (”GET 14-DAY TRIAL“on the price page)
- Fill out the registration form with your first name, last name, email address and password
- Click on the” buttonCreate account“
- Go to your inbox and open the confirmation email sent by Linked Helper 2. Click on the inside link to activate your account.
- Back on the Linked Helper 2 site, click on”SIGN IN“at the top right and enter your login details to access your account
- Click on”Download the app“

That's it, your Linked Helper 2 account is created!
You can now add your LinkedIn account to the app you just downloaded to start creating campaigns.
2. Connect your LinkedIn account
For Linked Helper 2 to interact with your LinkedIn account, you need to connect them first.

Follow these steps:
- On your Linked Helper 2 Dashboard, click on the “” iconLinkedIn Accounts“in the left sidebar
- Click on the” buttonAdd New Account“
- Enter your email and password (of your LinkedIn account)
- Click on”+ Add“
- In the pop-up window, click on”LinkedIn Account“
- A new window will appear, click on”Sign in with LinkedIn“
- If requested, enter your LinkedIn credentials and validate the permissions requested by Linked Helper 2
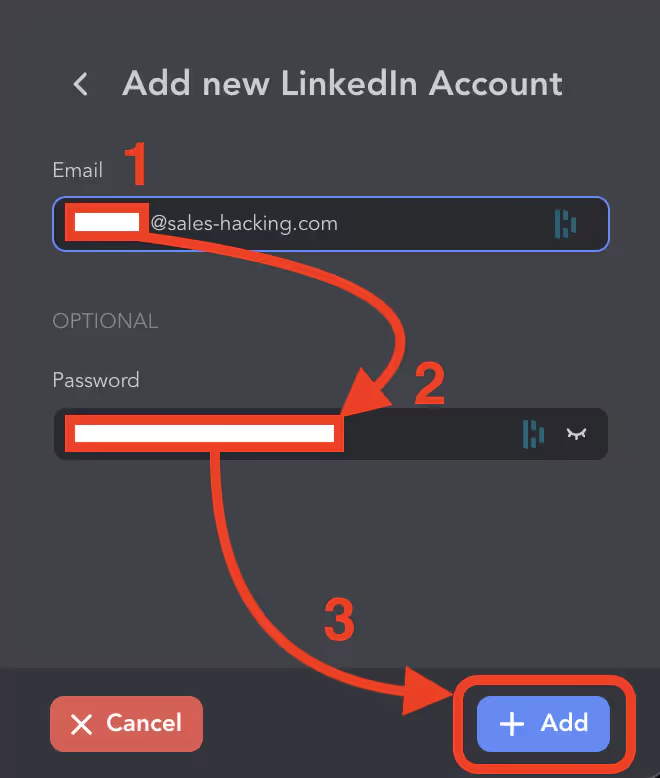
That's done, your LinkedIn account is now linked to Linked Helper 2! You can add more by repeating the process (up to 3 with the Pro subscription, or 30 with the Agency subscription).
Now let's move on to creating your first campaign.
3. Set up your campaign
With Linked Helper 2, creating a prospecting campaign becomes a real piece of cake.
Here's how to do it step-by-step:
- From your Dashboard, click on”Campaigns“in the left bar
- At the top right, click on the green button”Create campaign“
- A window pops up. Start by choosing a template from the options offered: “Invitations”, “Messages”, “InMails”, “Email Finder”... If you are just starting out, the template”Invite and Follow-Up“is a great starting point.
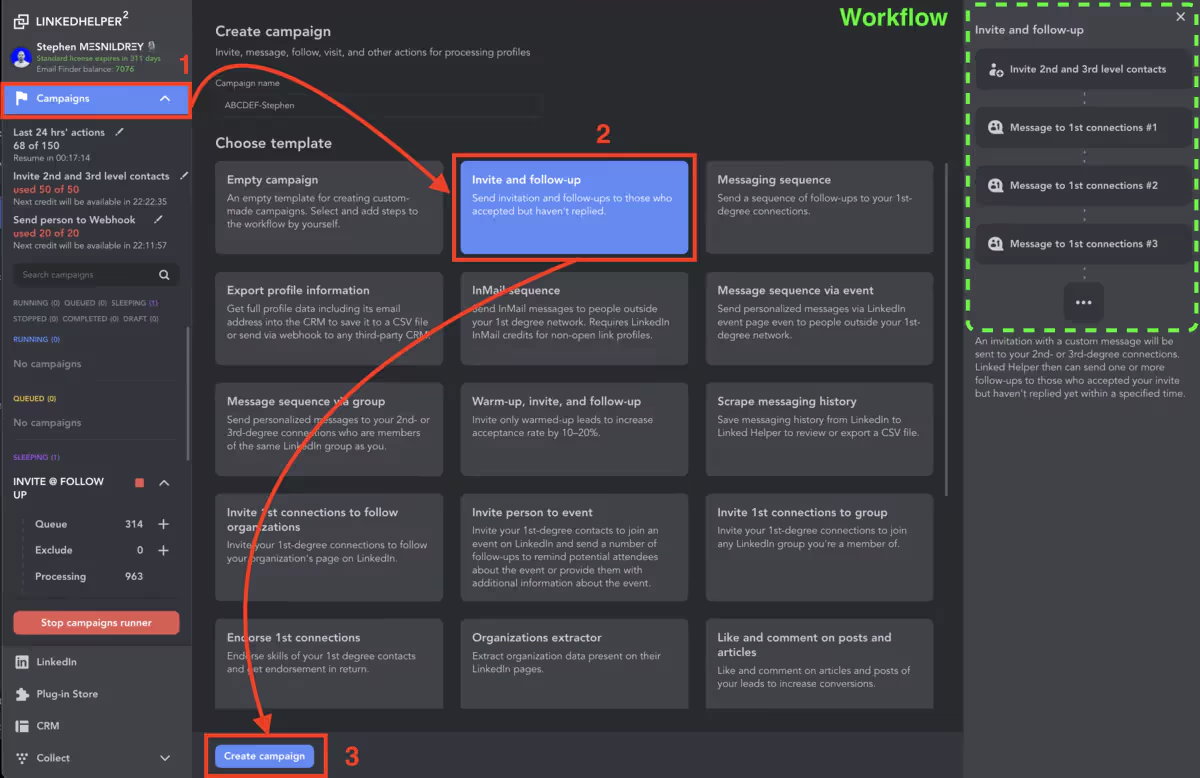
- Give your campaign a name in the” fieldCampaign Name“
- Below, choose the LinkedIn account to use for this campaign from the dropdown list.
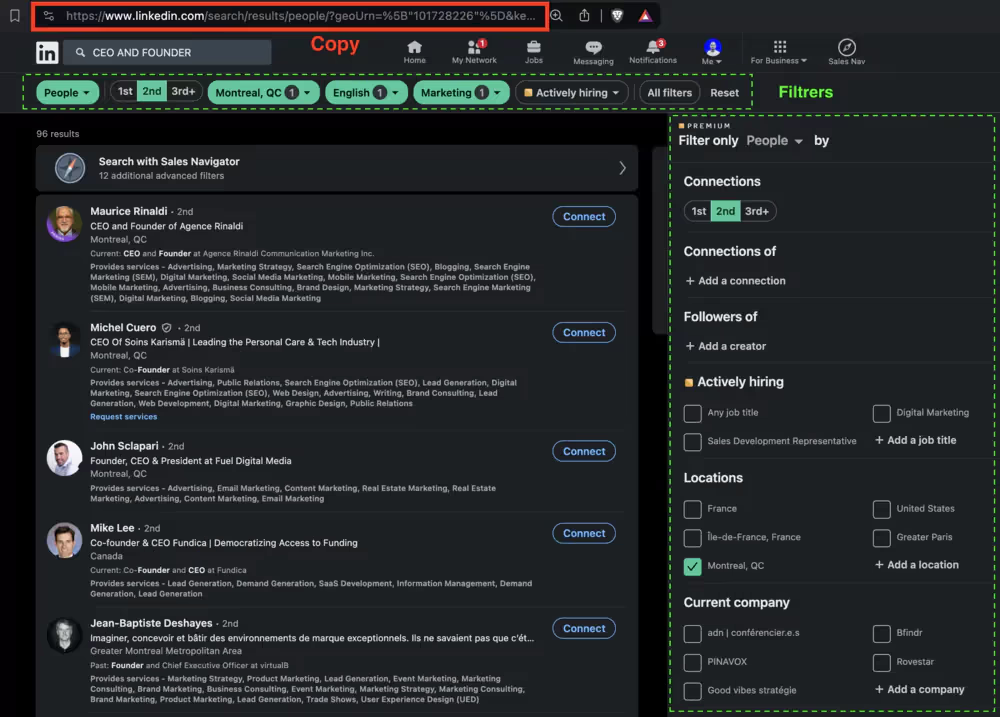
- In the zone”Search URL“, paste the LinkedIn search results URL containing the profiles you are targeting. Research example: agritech entrepreneurs in the United Kingdom.
To retrieve this URL:
- Go to LinkedIn
- Do your search
- On the results page, copy the full URL into the address bar (which should contain your query).
- Define the number of actions to be performed per day in the” fieldDaily Limit of Actions“. For a first campaign, start slowly with 20-30 daily actions.
- Choose what to do with profiles after an action is performed in”Tag Invited Profiles As“.
- “To Check Response“is a good starting point, to then check the responses to your invitations.
- Finally, check the message that will be sent to your prospects. The template is pre-filled with sample text that you can adapt.
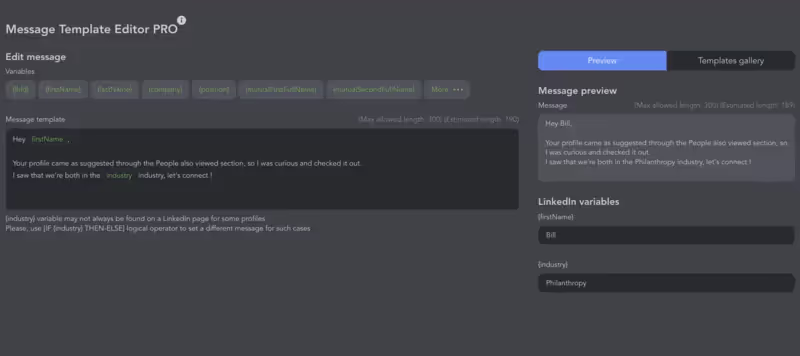
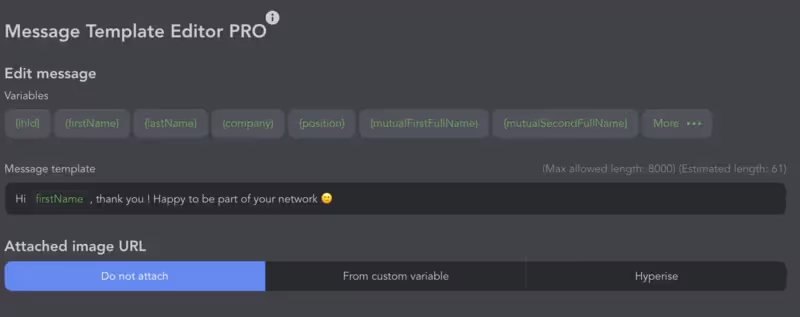
- Add a first follow-up message once your leads have accepted the request to thank them
- Satisfied? Click on”Launch CampaigN” at the bottom right!
Congratulations, your first campaign has been launched!
Linked Helper 2 will now get to work and gradually send invitations to targeted profiles.
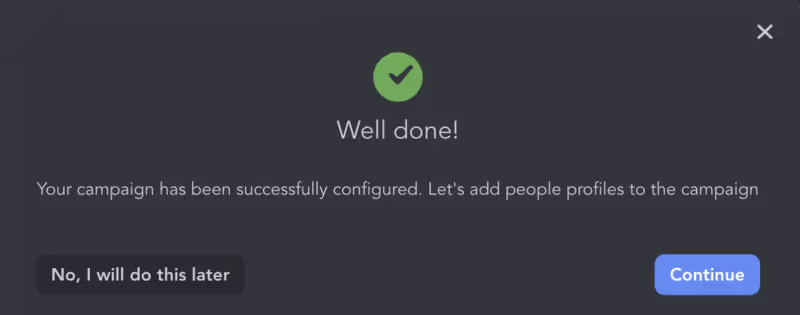
You can follow the progress of your campaign at any time from the “Campaigns” tab.
Click on the name of a campaign to access detailed statistics.
4. Find the emails of your LinkedIn leads
To transform your LinkedIn leads into business opportunities, you need their professional emails.
Here are two options for automatically finding and integrating them into your LinkedIn Helper workflow.
Option 1: Use Linked Helper 2's built-in Email Finder
Linked Helper 2 has its own email search tool. To use it in your sequence:
- Add an action”Find Emails“after a stage of visiting profiles or sending a message
- In the action settings, activate the option”Get email from LH Email Finder“
- Verify that you have successfully linked your Email Finder account in the integrations
- Record the action and launch your campaign
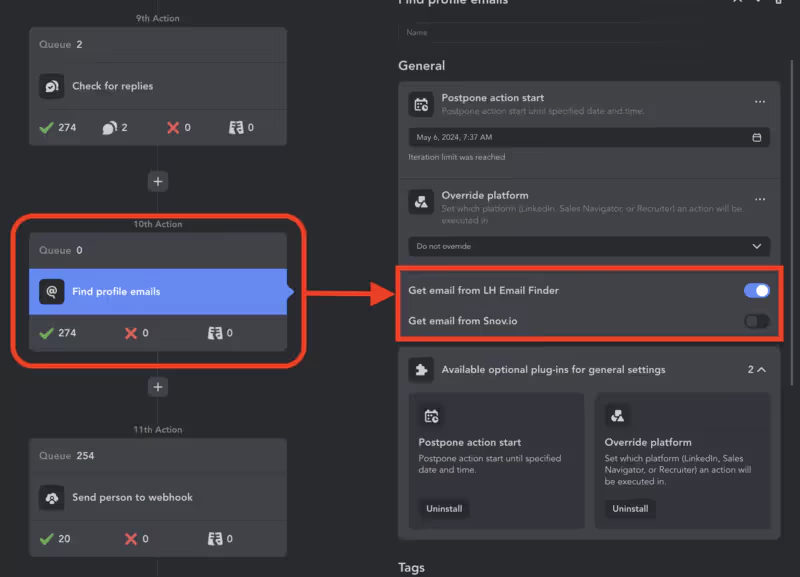
As soon as a lead has been processed, Linked Helper will automatically launch a search for their best pro email and add it to their form.
Option 2: Connect Snov.io to your workflow
You can also use an external email finding tool like Snov.io. Its integration is done via webhook:
- In Snov.io, go to “Integrations” and create a new webhook
- Copy the Snov.io webhook URL
- In Linked Helper 2, create a new action”Call Webhook“after your targeting stage
- Paste the webhook URL and map the fields to be sent (first name, last name, company...)
- Test and activate the sequence
Linked Helper will then automatically send the information of the targeted profiles to Snov.io which will launch an email search and send it back to you. You can retrieve this result in a step”Delay“then a condition”Webhook responded?“.
This addition will allow you to obtain the precious email addresses of your LinkedIn leads, and thus to integrate them into your multi-channel lead machine.
5. Synchronize your new leads with your CRM and Emailing Tool
Now that you have the email addresses, you probably want to contact your leads and integrate them into your email nurturing. Once again, Linked Helper 2 makes your life easier!
The tool integrates natively with the best engagement platforms:
- Lemlist
- Woodpecker
- Mailshake
- Reply.io
- HubSpot
- PipeDrive
Here are the two detailed options for synchronizing your LinkedIn leads with your emailing tools, using the same approach as before:
Option 1: Automatically send cold emails with Pipedrive
Linked Helper 2 integrates natively with Pipedrive, allowing you to send emails to your leads directly from your CRM. Here is how to set up this automation:
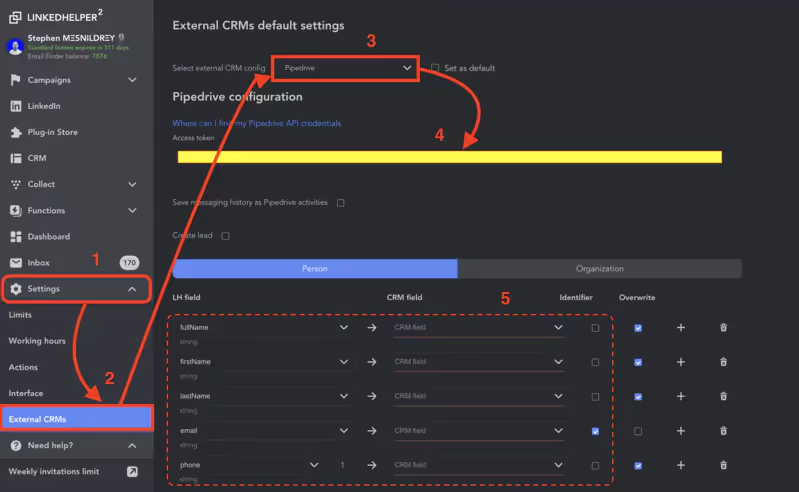
- Go to the” sectionSettings“>”External CRMs“from your Linked Helper 2 dashboard
- Select”Pipedrive“in the list of available integrations
- Click on “Integrate” and log in to your Pipedrive account
- Allow Linked Helper 2 to access your Pipedrive data
- Map fields between Linked Helper 2 and Pipedrive (name, email, company...)
- In Pipedrive, go to”Automation“then”Workflow Automation“
- Create a new workflow and choose “Person created” as the trigger
- Add an action”Send email“and write your cold email template
- Save and activate your workflow
Now, as soon as a new lead is added to Pipedrive via Linked Helper 2, they will automatically receive your cold email.
Everything is managed from a single tool, your CRM!
Option 2: Enrich your Woodpecker campaigns with Make
If you prefer to use a tool dedicated to cold emails like Woodpecker, you can connect Linked Helper 2 and Woodpecker via Make (formerly Integromat).
Follow this process:
- Register for free on Make via this link: Register on the Make website
- In Make, go to “Create a New Scenario” then select”Webhooks“
- Click on”Add Webhook“and copy the generated webhook URL

- Create a new scenario in Make and choose”Webhooks“>”Custom Webhook“as a trigger module
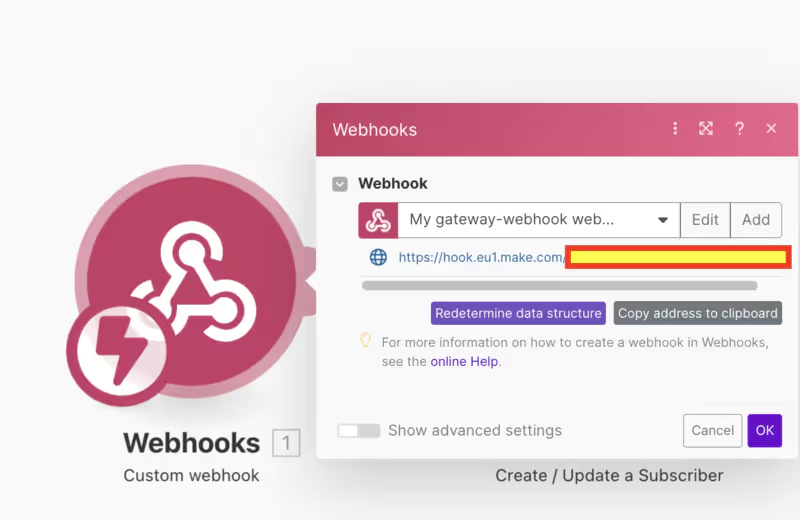
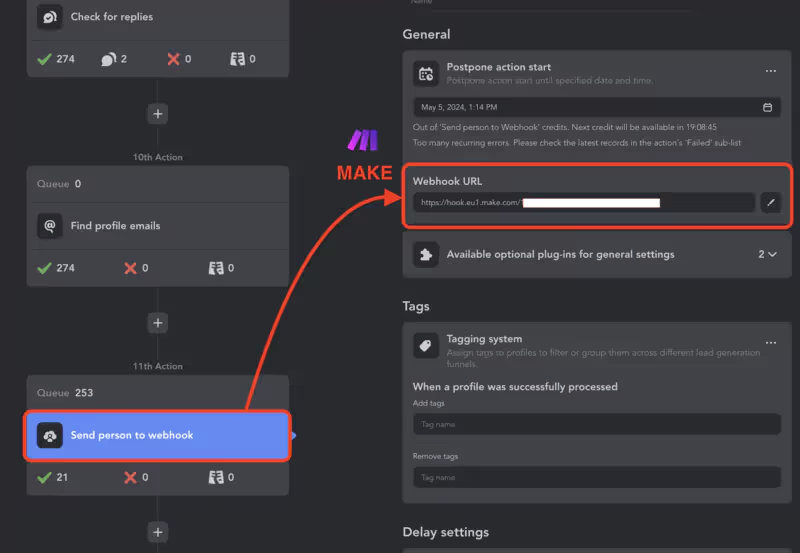
- Paste the Make webhook URL in Linked Helper 2 into the” fieldWebhook URL“
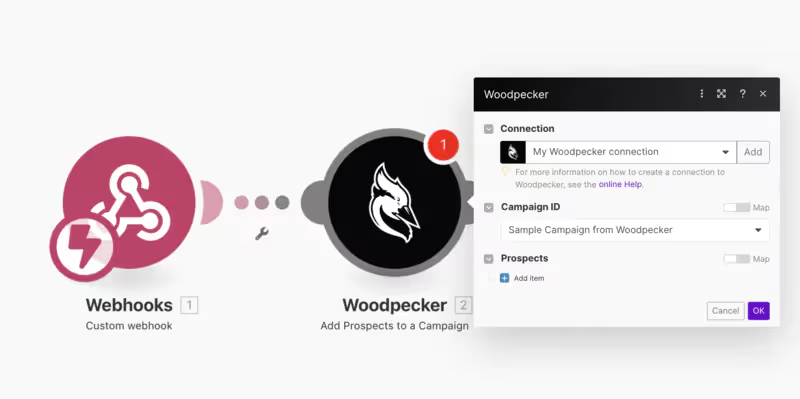
- Click on”Add Another Module“and choose”Woodpecker“
- Select”Add Prospect“as an action and connect your Woodpecker account
- If you don't have a WoodPecker account, sign up for a free account:
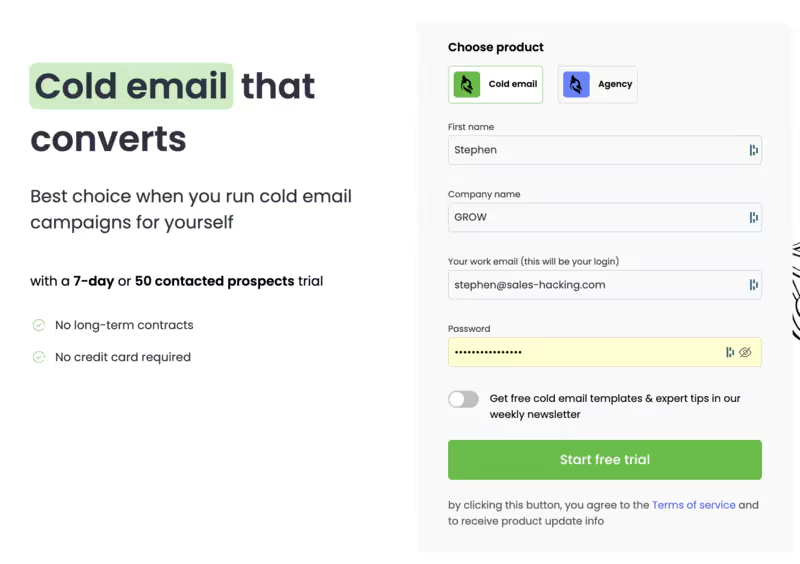
- Click on the settings and then check in Add-ons that”API Keys & Integrations“is of course in the “active” status
- Click on Integrations, to create an API key

- Paste your API key requested by Make to validate the integration with WoodPecker
- Map fields between the Linked Helper 2 Webhook and Woodpecker

- Add a filter”Set Up a Filter“on this connection to make sure that only the leads whose email has been retrieved are sent to your cold emailing software.
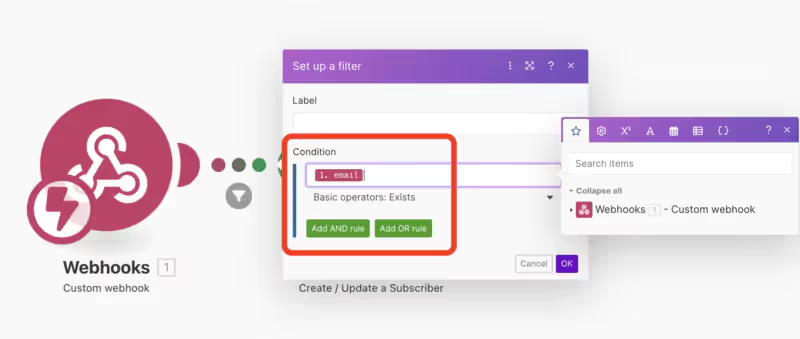
- Test the scenario then save and activate it
From now on, each new lead generated in Linked Helper 2 will be directly imported as a lead in Woodpecker. You can then integrate it into your cold email campaigns.
With this two-step automation, you enrich your email sequences with highly qualified LinkedIn leads!
FAQs
Is Linked Helper 2 secure and undetectable by LinkedIn?
Yes, Linked Helper 2 is designed to respect LinkedIn's boundaries. It simulates realistic human behavior and intelligently spaces actions. In addition, it is updated very regularly to incorporate the latest changes in the LinkedIn algorithm. Finally, its cloud mode allows it to bypass detection by LinkedIn.
Can I use Linked Helper 2 on multiple LinkedIn accounts?
Absolutely! All you need to do is switch to a Premium or Corporate account to be able to add and manage several LinkedIn accounts from your Linked Helper 2 dashboard. Perfect for sales teams or agencies!
What emailing tools are compatible with Linked Helper 2?
Thanks to Make (ex-Integromat), you can connect Linked Helper 2 with most of the emailing tools on the market: Woodpecker, Lemlist, Mailshake... The possibilities are almost endless! You can even add email verification or enrichment steps.
How do I find the most effective campaign templates?
For inspiration, feel free to join the Linked Helper 2 community on Facebook or check out the template library on the site. You will find best practices and feedback from thousands of users. It's the perfect opportunity to replicate what works and optimize your results!
Conclusion
You now have all the keys in hand to synchronize your LinkedIn prospecting with your emails, whether directly in your CRM with Pipedrive or via your favorite cold emailing tool like Woodpecker.
Thanks to native integrations or via tools like Make, Linked Helper 2 fits perfectly into your prospecting stack and shares your lead data with all your tools. This is the guarantee of smooth and effective multi-channel prospecting.
So it's up to you to choose the method that best suits you and to test these automations. Your sales team will be amazed at the quantity of qualified prospects that will land in their inbox!
Remember to measure your results to optimize your messages and audiences on an ongoing basis. Now that your lead machine is running at full speed, you have plenty of time to test and learn.
Go revolutionize your pipeline, one cold email at a time!
.svg)


