What is A/B testing?

A/B testing is a effective way to find and make improvements to your business website that have an impact on your online success.
It's about creating a second version of your page with slight differences and distributing traffic between the 2 versions equally. This allows you to see which variant is the most efficient.
For example, your original page, Variant A, might have a blue call to action (CTA) button. To see if a different color results in more clicks, you can make a copy, variant B, and make the CTA button red.
Then you can send 50% of your traffic to page A and 50% to page B to see which button color has the best click rate.
By running A/B Testing, you can Learn how to create a page that offers the best results for a specific purpose.
Then, you can publish this page for all visitors to your website to view.
Why do A/B testing?
Depending on how you set up your tests, A/B testing may have a significant impact on your business success.
In one example, the marketing agency Inbound Logic increased conversions by 1500%. And she did it thanks to a combination From Exit Popups and A/B tests on their call to action (CTA).
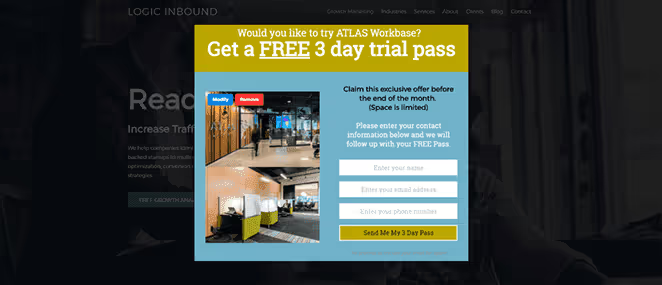
So, with the right approach, testing can impact your ability to generate conversions because you can learn what works best for your audience.
While it's tempting to research what other businesses are doing and copy it onto your site, we recommend avoiding that. What works for a website won't necessarily work for yours because your audience is unique to your brand.
Instead, start creating variants taking into account your website visitors rather than copying generic best practices.
Essential elements for testing and optimizing A/B Testing
In terms of what you should test, it depends largely on the type of business you run.
That being said, there are several key things you should include in your A/B testing:
- Title - Make your title actionable, engaging, and aimed directly at your audience. Experiment with different versions to see which gets the most clicks or keeps users on the page.
- Call to action button - Test the location of your button by moving it up or down the page. You can also test the size, color, and animation of the button to see what works best.
- Copy of the call to action - The copy of your CTA button should clearly state what you want visitors to do. It should be concrete and appealing, but also brief. You can then test your copy of the CTA to see which version increases conversions.
- Sales text - Make your sales text easy to understand Speak in the language of your audience and avoid confusing jargon. You can try to add feature lists to your pricing page so that users don't need to go from page to page.
- Product description - Make sure that your product descriptions are understandable to your visitors. Explain what each feature means and how it can impact the user experience. You can test the version that gets the best response.
- Testimonies - Test the location of your testimonials, so that they are in the best place to convince users to convert. This is often the bottom of a page, where users are about to make a purchase decision.
Make a plan of what you want to test on your website or landing page. You can then start looking for A/B Testing tools to help you in your growth experiments.
Generally speaking, I use Google Optimize for A/B testing: keep reading to find out why I think it's one of the best tools for A/B testing.
Why use Google Optimize for A/B testing?
There are several A/B Testing tools that you can use to optimize your website.
But many of them have a high price and are difficult to use if you are new to the subject. However, Google Optimize is an exception insofar as it is free and relatively easy to use.
Google Optimize offers a direct integration with Google Analytics, which allows you to run A/B tests, various tests based on previously collected data.
Google Analytics being an indispensable tool for website owners, the ability to access test data in your account is very convenient. In addition, your A/B tests appear in your reports, which allows you to monitor the behavior of visitors on the site based on the variations they see.
Additionally, there is a paid version of Google Optimize 360, which allows you to use your data Google Analytics to target the right population. It's a great choice for businesses that have the time and resources to do extensive A/B testing.
However, the The free version of Google Optimize offers everything small and medium businesses need to optimize their sites.
What if we discovered how to do A/B Testing by an example?
How do you A/B test your landing pages with Google Optimize?
This section of the article explains how to run A/B testing with Google Optimize.
We're going to see each stage in simple terms so that you can perform tests yourself and improve your business through results.
Create a Google Optimize account
The first step is to visit the Google Optimize website and to create a free account.
Just click on the “Start” button.

Then, fill in a few optional details about permissions and data sharing and click the Done button.
You will now be taken to the Google Optimize dashboard. Click the “Let's Go” button to create your first experience.
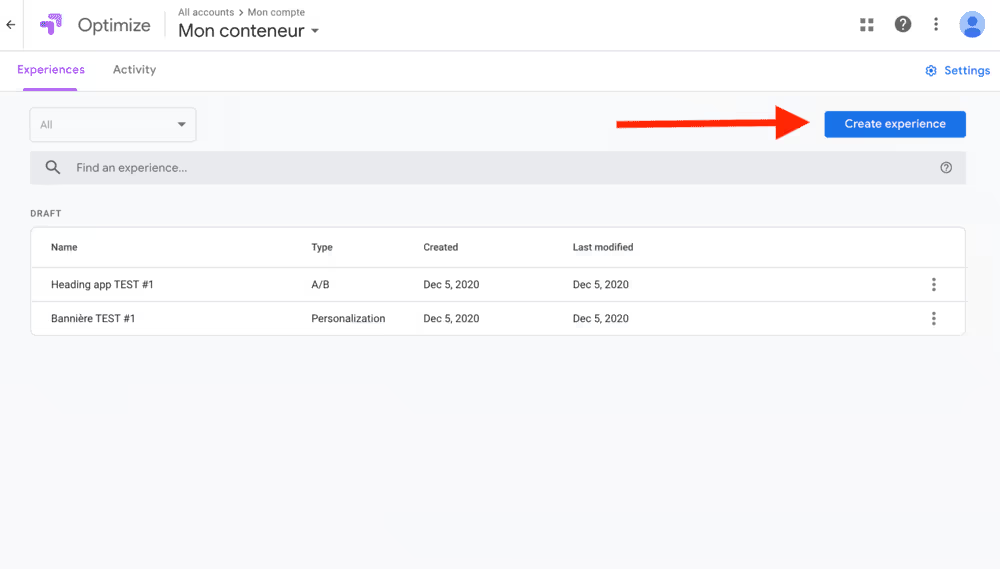
This brings up a sliding panel where you can give your experience a name, add the URL of the web page you want to use, and choose a test type.
We'll be using the A/B test type for this experiment; however, later in this post, we'll show you how to test 2 different landing pages with the redirect test.
With the A/B test type, you can test different elements on your websites, such as different CTA buttons, images, and even your entire landing page design.
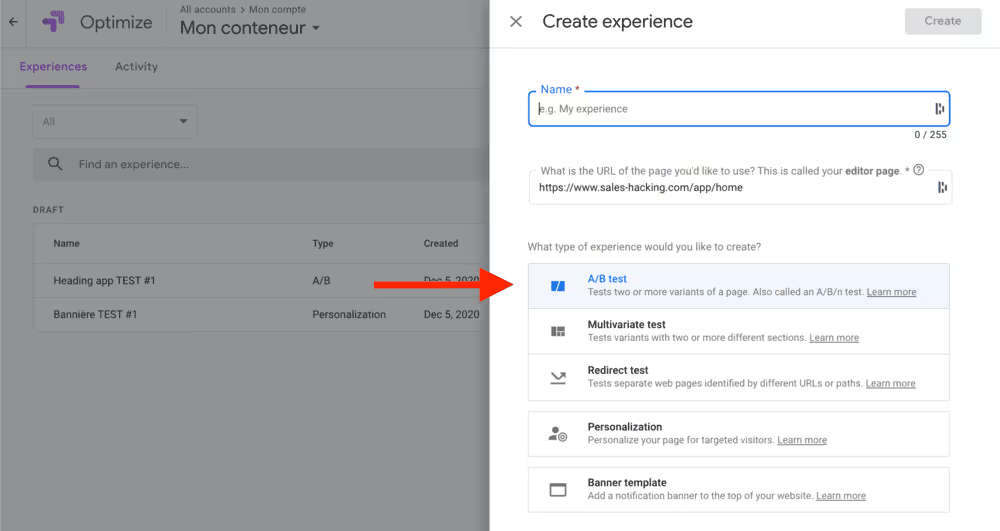
After choosing your test type and entering your primary URL, click the Create button.
Add a variant to the A/B test
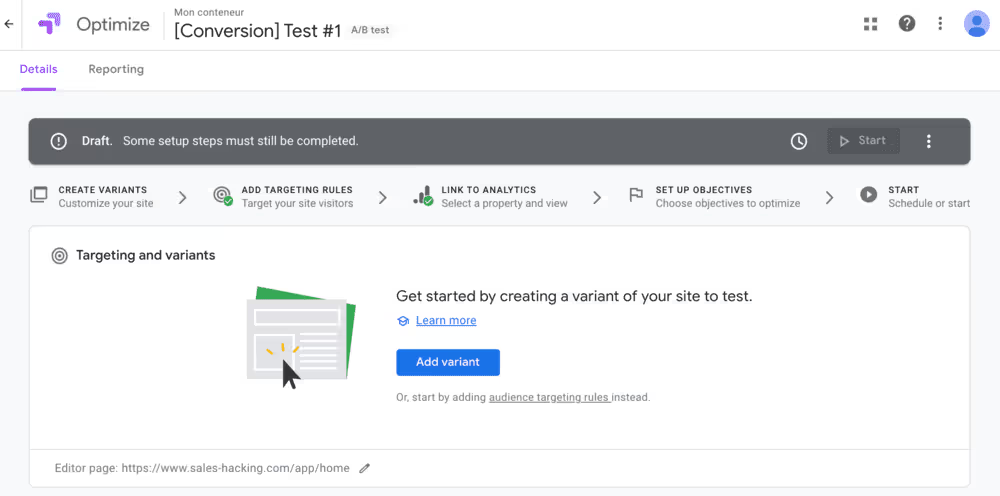
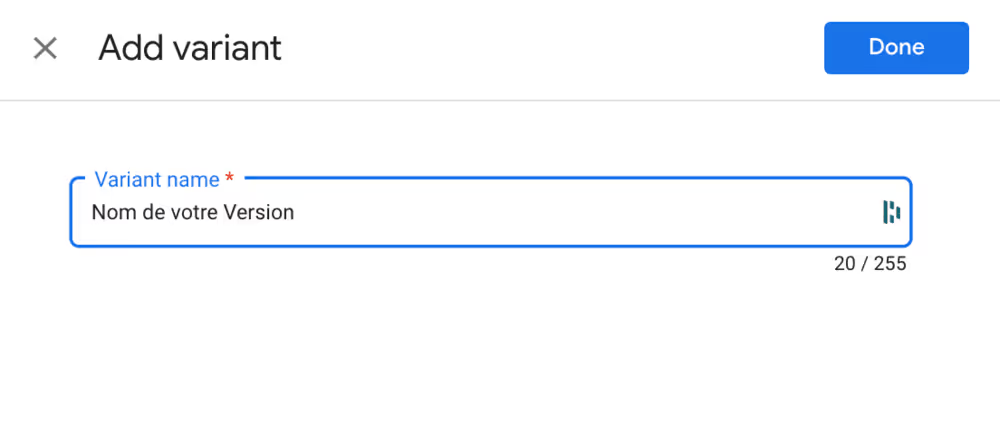
The next step is to add a variation of the page you want to test. Start by clicking the Add Variation button to open a panel on the right side of your screen.
Give your variant a name and click Done. In this example, we're testing a different version of the button text to see which version gets the most conversions.
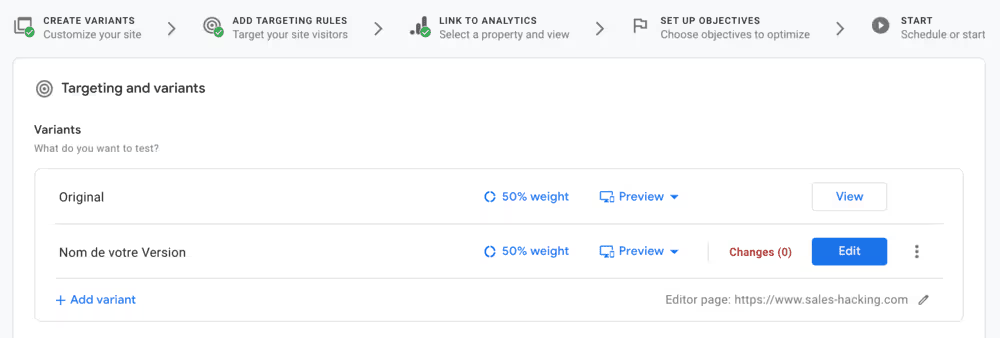
Once your variant is set up, it's time to modify it with the changes you want. Click on the Edit button to get started.
You'll see a pop-up window asking you to install a Google Chrome extension.

This allows you to use a visual editor to customize your variant, for example by changing the copy of the button, its location, etc.
- So click on the button Add the Extension and follow the instructions to add it to your Google Chrome browser.
- Then, refresh your Google Optimize page and click the Edit Page button again.
This time, you'll see an editable version of your web page. You can click anywhere on the page to make the changes you need.
In this example, we are going to select the button and click the Edit Item button on the right. In our case, I'm going to create a variant with the button in red.
%25252520(1).avif)
When you're happy with your changes, click the Save button in the top right corner of your screen, then click Done to return to the Google Optimize dashboard.
Choose Page Targeting Rules
In the “Variants” section, you can choose where your experience runs on your website.
By default, this choice is made when the URL matches the URL used in step 1.
However, by clicking on the Add URL Rule link, You can define a rule for a URL, a host, a path, or a URL fragment :
- Correspondances
- Does not match
- Is equal to
- Contains
- Start with
... a particular value.
We're going to leave this setting with the default options for now.
Under this section, you can customize audience targeting and add a description to help team members understand your experience.
Connect to Google Analytics
Google Optimize uses Google Analytics to measure the results of your experiences.
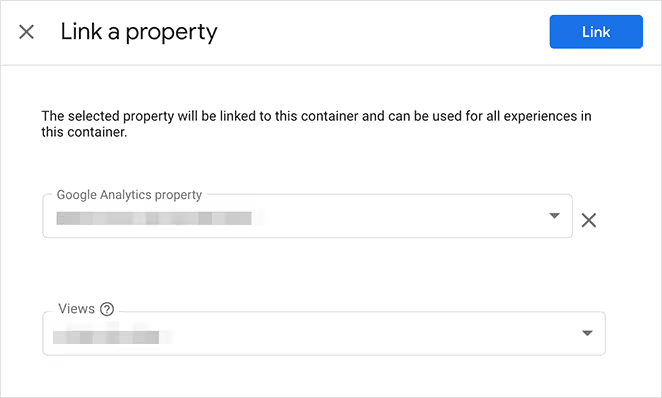
So for this step, you need to connect your Analytics account.
Click on the” buttonLink to Analytics“, then choose your property from the dropdown menu on the right.
Define the goals of your test
Once your Analytics account is connected, you can choose from a range of different test goals or set a custom goal. Goals are metrics against which your test is evaluated, allowing you to know which variant is performing best.
To set your goals, click the Add an Experience Goal link and choose an option from the dropdown menu.
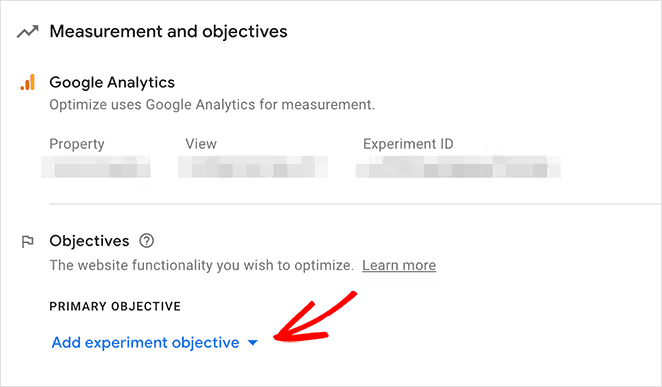
You can choose from a list of goals associated with your Analytics account, or create a custom goal based on your specific needs.
Install the Google Optimize Snippet
Now that your experience is set up, you need to install Google Optimize on your website. How you do this depends on how you set up Google Analytics.
If you added Google Analytics to your website manually, simply click on the View Instructions link.
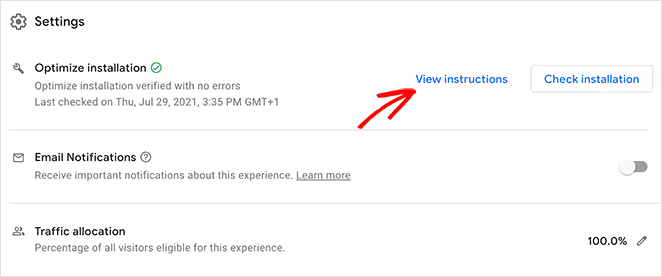
Then, on the next screen, copy and paste the Google optimization code into your header.

However, if you installed Google Analytics with a WordPress plugin like MonsterInsights, you will need to enable Optimize in this plugin.
To do this, log in to your WordPress dashboard and go to Insights "Settings" Conversions. Then add your container ID in the Google Optimize container ID field.
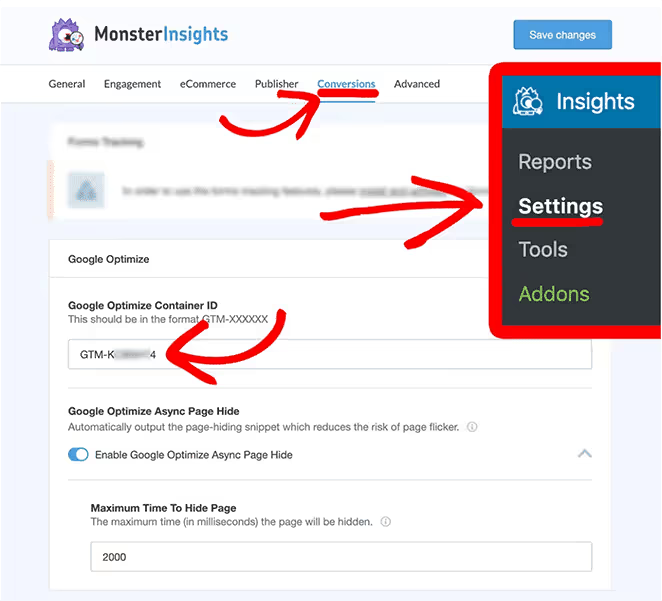
You can find your container ID by selecting All Accounts in Google Optimize.
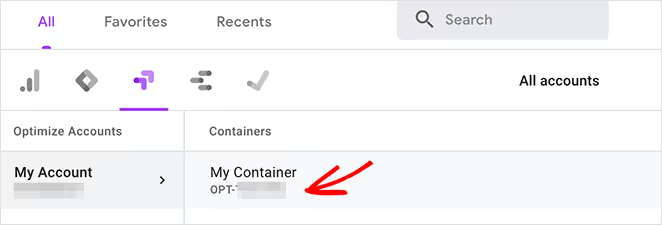
You can also click the check box next to Enable compatibility with Google Optimize Async Page Hide.
This reduces the risk of the page flickering (the original page appears briefly before loading the variation). Elle also ensures that users with slow connections have a better experience by only displaying experience variants when the Optimize container loads.
Run your A/B test
Now that you've successfully set up and installed Google Optimize, you can start experimenting.
Go to the top of the page and click on the “Start Experiment” button to start your test.

Great job! Your first Google Optimize A/B test is online. Let it work for a while, then you can stop the test using the same panel and check your results.
How do I test Landing Pages with the Google Optimize Redirect Test?
The next section of this article explains how to test different versions of the same landing page with the Google Optimize redirect test experience.
The redirect test compares different web pages with different “paths” or URLs. For example, you can create 2 completely different versions of a landing page and split the traffic between them to see which one delivers the best results.
Follow the steps below to learn how to do this experiment.
1. Create landing page variants
For this test, we are going to compare 2 different landing pages to see which design is the most efficient.
To do this, you first need to create the pages on your website.
I will use EngageBay to create Landing pages unto high level of conversion.
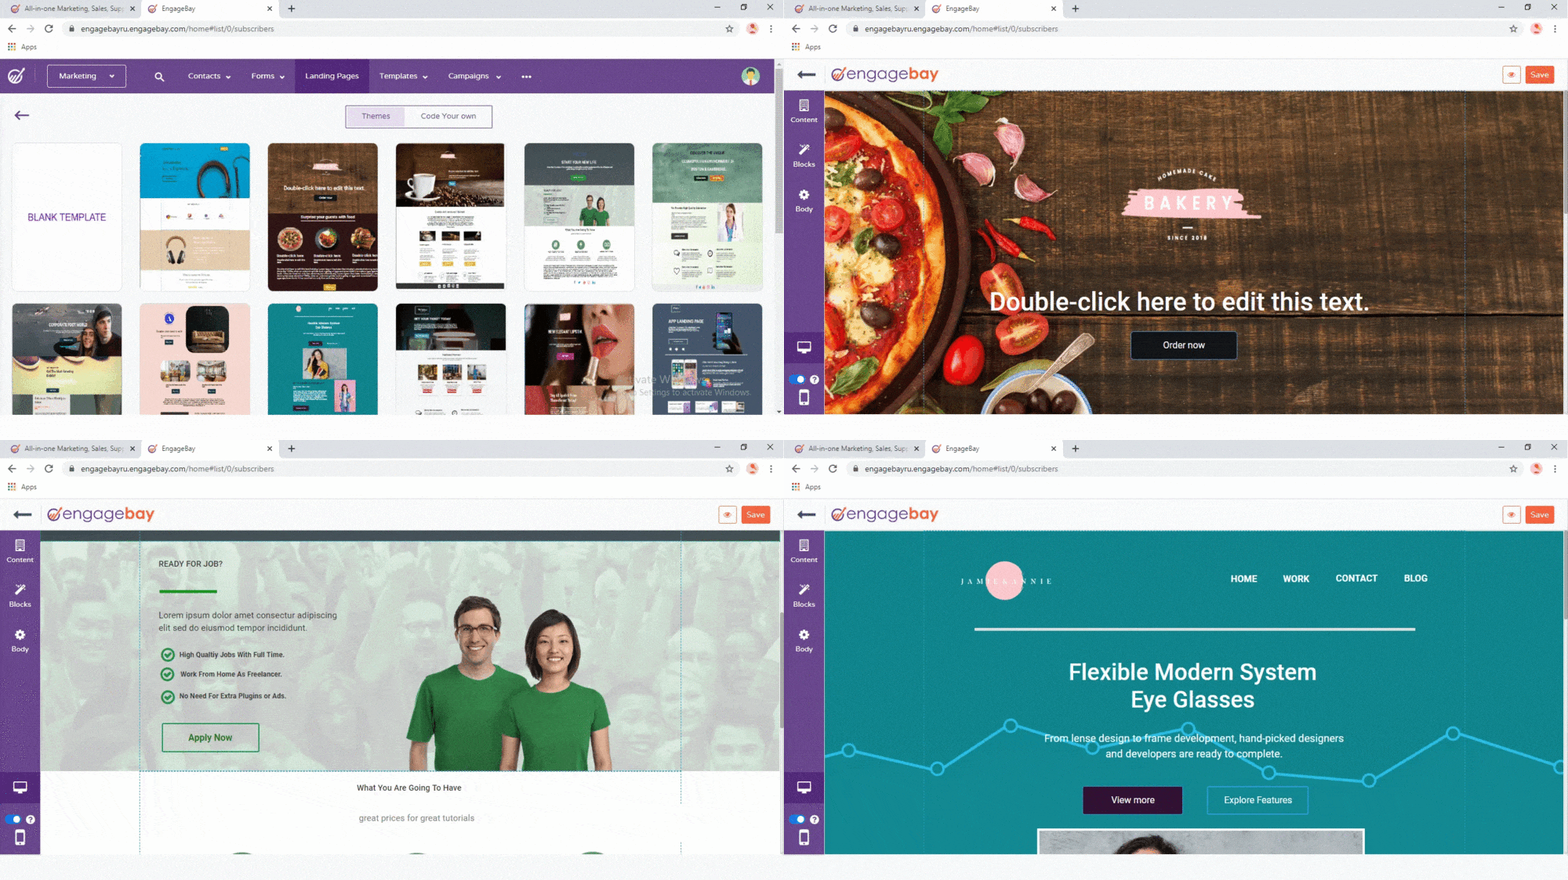
Engagebay It is a solution similar to Hubspot that I adopted and that allows me to create landing pages, manage my CRM and all the marketing automation tools possible at a low price.
For this example, I created 2 landing pages with totally different styles at the end. For simplicity and readability, I only put “bits” of these landing pages.
For the first release, I used a default template and style:

And in the second version, I customized the model with the visual editor in 10 seconds (sorry I did something very quick because I mainly want to focus on A/B testing with Google Optimize):

After creating your landing page versions, copy the URL for each page.
2. Create a new Google Optimize redirect test experience
Then, log in to Google Optimize and click on the Create Experience button.
Then add a name to the experience and enter the URL for your first version of your landing page.

Then select the Redirect Test option and click on the Create button.
3. Add your landing page variants
As you did in the previous test, click the Add Variant button to add the second version of your landing page.
As you can see in the preview, Google Optimize will test the second version of the landing page against the first version.
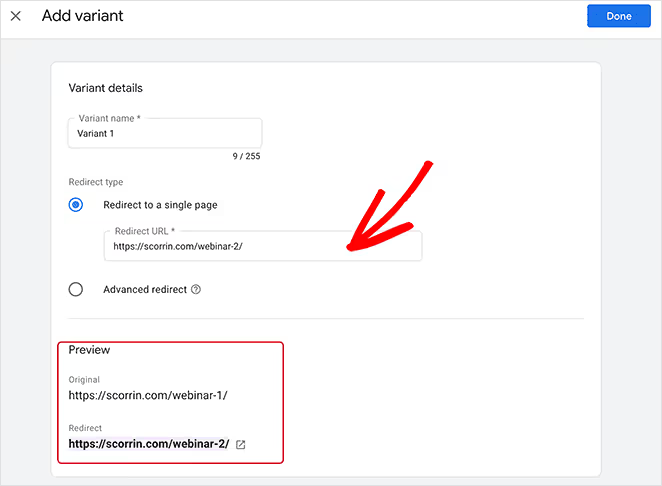
Click Done to proceed to the next step.
4. Configure your settings
Now you can define the goals of your test, just as you did in the A/B test experiment.
You can add as many goals as you want, depending on your business goals. You can add as many goals as you want, depending on your business goals.
Then, check that Google Optimize is properly installed by clicking on the Verify Installation button.
5. Start your test
After completing the previous steps, scroll to the top and click Start.

Your test will now be started on both versions of the landing page until you decide to stop it. In general, it's a good idea to let your test run for one to two weeks to gather enough data.
Google Optimize A/B test results analysis
Once you've launched, run, and evaluated your A/B tests using Google Optimize, you can start to check your results.
There are 2 ways to do this:
- You can click on the Reports tab in your Google Optimize dashboard and see details such as the number of experiment sessions, dates, improvement, etc.
- You can also use the Google Analytics reports to access all the data related to your experiences. (You can find out more about this type of data by consulting the resource center from Google)
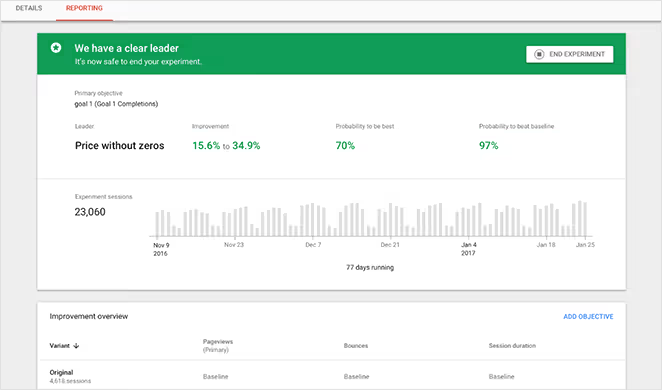
With this data, you can add winning changes to your live website and see the improvements translate into tangible results for your business.
Hopefully this article has helped you learn how to do A/B testing with Google Optimize for your website.

.svg)


