Twitch Overview.
Twitch.tv is a live video streaming platform that allows users to download and watch various online streams in various genres: gaming, creative arts, music, yoga, karate, etc.
It's where streamers from around the world come together to build community, share tips, and collaborate on creative projects.
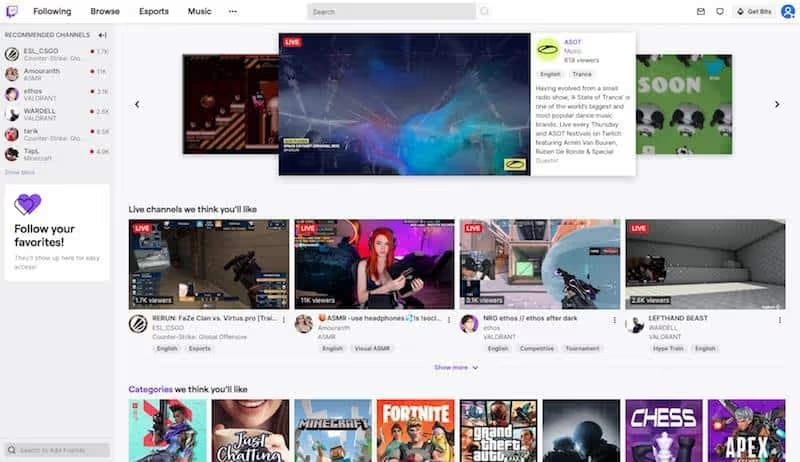
The platform was founded by Justin Kan in 2011 and gained 45 million unique visitors in October 2013.
Predicting the vast potential, Amazon acquired the platform in August 2014.
It continued to develop - with 55 million users in 2015, reaching 140 million unique visitors every month in 2020. Today, it is one of the biggest streaming services on the internet.
Some of the most popular streamers have made a name for themselves on the platform over the years, like Dr. DisRespect or Shroud.
Some movies even ended up being a promotional thing for Twitch streams.
For example, Avengers Infinity War enjoyed immense popularity on Twitch for weeks after its release.
Why stream on Twitch?
Here are a few of the reasons why you should stream on Twitch:
- The Twitch API is designed for streaming purposes. The platform interface offers native integration with Live: Air Solo, making it easy to connect it to your account.
- After the latest update, Live: Air now has a new tool, Twitch chat, integrated at the bottom of the main Live: Air interface. It helps you interact with viewers during the live broadcast.
- The delivery software automatically segments your streams into different categories in order to direct interested audiences to your content.
Get started with Twitch.
There are specific settings and configuration options before you start streaming.
Here's a step-by-step procedure for how to stream on Twitch:
1. Create your account
Creating an account is easy. But before that, be sure to read the general conditions And the community guidelines. You will find everything you need to know about the site and each of its functions.
Be sure to follow the rules and guidelines. Moderators take responsible use of this tool seriously. If you are banned, there is no official way to do so. Your account will no longer be relevant and you may need to start over with a new IP address and account.”
To create an account through the office, go to the official site.
Once on the home page, simply click on “Register” and fill in the fields with your personal information.
You will see the Login/Register screen appear. Complete the registration form with the required information, including your username, password, email address, and birth date.
You can also choose a display name if you don't want to use your real name for your channel.
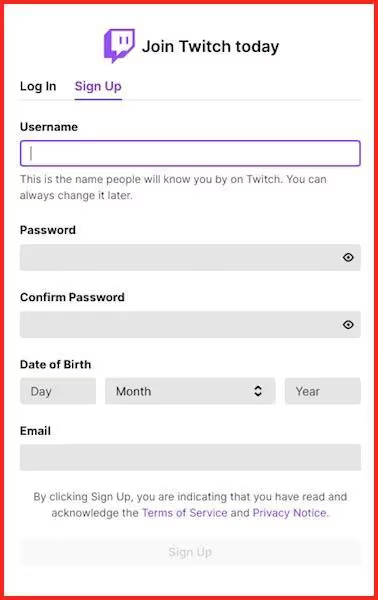
For mobile enrollment, download the mobile app for your device, install, and launch the app.
Click on the “Sign-Up” button You can sign up using your mobile phone number or email address. Twitch recommends signing up with your phone number and then adding and verifying your email address.
Verifying your email address will allow you to:
- Get email notifications.
- Access your account if you lose your mobile contact information
- Chat in other channels that require email address verification.
If you want to register with an email address, click on the “Use email address” option.
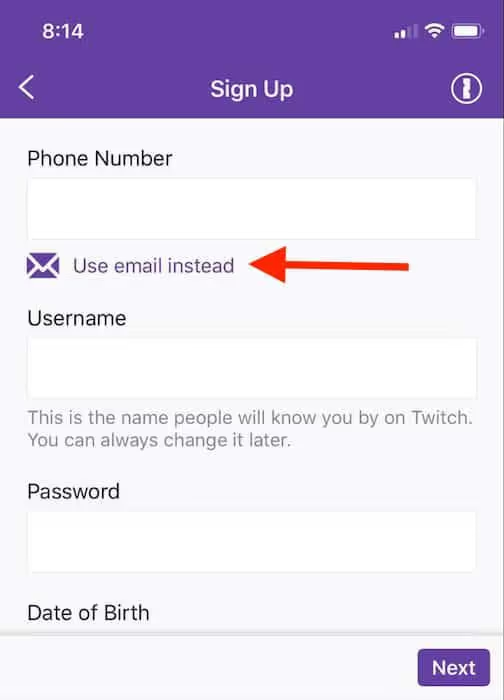
After entering the details, click on the “Sign Up” button.
You will receive a one-time password (OTP) in the form of a six-digit code via text message or email to confirm the phone number or email address you provided.
Once you become a user with a verified email address on your account, you can also create additional accounts.
All you need to do is activate a setting in the section of security settings from your dashboard.

2. Set up two-factor authentication.
Twitch makes two-factor authentication mandatory to protect your account from unauthorized connections.
And note that you won't be able to stream if you don't enable two-factor authentication.
However, you can't enable two-factor authentication if you don't verify your email account first.
If confirmed, go to the settings page for security and confidentiality from your desk.
Select “Set Up Two-Factor Authentication” and choose the “Enable 2FA” option.
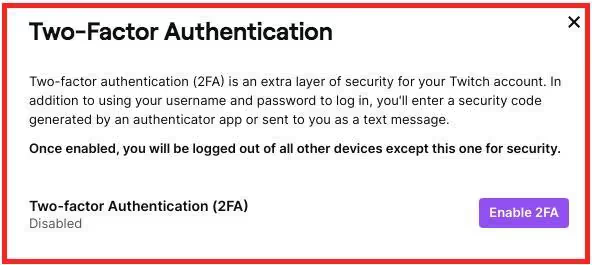
Then, enter your phone number and click on the “Continue” option.
Now check the 7-digit verification code you will receive via text message on your phone and enter it. Select Continue
If you're using an authenticator app, you'll need to scan the QR code displayed with your phone's camera. You can even skip this step and use SMS instead.
For the QR code, you can download an authenticator app from your phone at any app store.
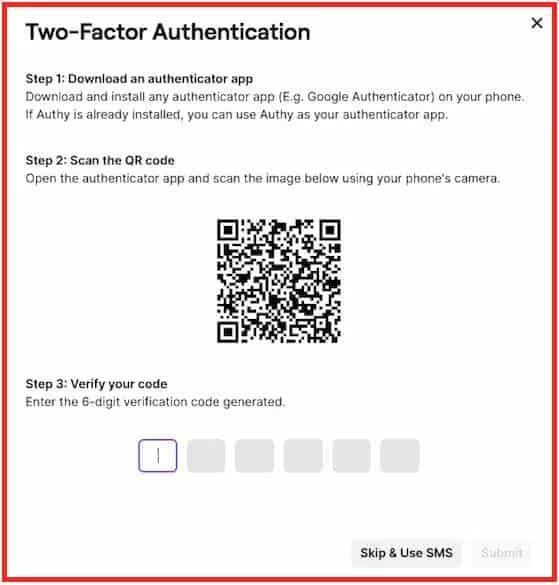
After scanning the QR code, enter the six-digit verification code created in the authentication application and click on the “Submit” option.
Finally, your account is now secured with two-factor authentication (2FA).
3. Choose the right software to stream live on Twitch.
Software is one of the essentials of streaming if you're doing it from your PC. It's what allows you to connect your webcam to stream, play a game, stream online, and talk to your viewers.
Some of the most important software choices are:
- Twitch Studio
- OBS project
- Streamlabs OBS
- XSplit
- Vmix
- Elgato Game Capture
- Live Gamer Extreme
- Lightstream

Twitch itself recommends these platforms for newbies and first-time broadcasters. There are free and paid software encoders.
Here are some of the key features of live streaming software to look for:
- Compatibility - Is the streaming software compatible with many platforms? You need to be able to stream on Twitch, YouTube Live, Facebook Live, LinkedIn, Twitter, etc.
- Customization - Check if the customization options and functionalities of the software meet your needs.
- High-performance integrations - Integration with third party applications and plugins is crucial.
- Support - Support is an asset, because you never know when you might get stuck.
- Easy to set up and use - Choose live streaming software that has an intuitive interface that makes it easy to add channels.
The software you choose depends on a number of factors. However, OBS Project, Streamlabs OBS and XSplit are some of the most popular software programs that you can check out.
Here is a brief overview:
- XSplit - XSplit is the easiest to use, but it's only available on Windows. It offers easy installation, 24/7 customer support, and multiple customization options. You can use it to stream to Twitch, YouTube, Facebook, Mixer, Twitter, and more.
- Open Broadcaster Software (OBS) Project - This is an open-source platform that is compatible with Windows, macOS 10.13+, and Linux. However, initial configuration will require more steps than XSplit.
If you are completely new to streaming, you can use Twitch Studio, Twitch's streaming software. This free streaming software is specially designed for new creators who want to share content with a community. You'll find it directly in your dashboard.
You'll even have access to the guided configuration process, customization options, and customizable templates.
4. Choose the right hardware for the live broadcast.
You need to have a reliable hardware system for streaming on Twitch.
Don't worry about getting the latest processor generation or DSLR model to stream on the platform, as it doesn't support 4K streaming. However, he must be up to the task.
Here are some of the hardware recommendations:
Computer.
Use a computer that can allow you to stream without problems, especially if you plan to stream heavy PC games. A functional computer with solid performance is sufficient for a good streaming experience.
Your computer should also quickly encode your video and audio and send them to Twitch for streaming.
Laptops.
Choose a laptop if you need to travel or broadcast in busy areas. These laptops will be more expensive than a standard laptop, but they will be worth every dollar.
Twitch recommends the following laptops for streaming:
- ASUS TUF Gaming Laptop, 15.6" (Basic Laptop).
- ASUS ROG Strix Scar II Gaming Laptop, 15.6" (Mid-Range Laptop)
MacBooks are also a popular choice among creators, especially musicians. They are more suitable when you are going to spend several hours a day on your laptop.
Twitch suggests a 13" MacBook Pro with 1.4GHz 8th Gen i5 128GB Storage.
However, you need an additional USB C Hub adapter with Ethernet, HDMI, and USB 3.0 ports to stream with a Mac.
USB interfaces/Mixers.
You'll need an interface or mixer with a USB output to connect your audio equipment to your streaming computer.
Here are some popular options:
- Yamaha AG03 (Basic mixer)
- Focusrite Scarlett 2i2 (Basic Interface)
- Yamaha MG10XU (Mid-Range Mixer)
- Mackie ProFXv2 (Mid-Range Mixer)
- Steinberg UR44 audio interface (high-end interface)
Microphones.
Microphone quality is critical for streamers because you need a device that can pick up your voice. Your voice needs to be audible for viewers to understand what you're saying.
The most popular streaming microphones are:
- Blue Yeti (Base Capacitor)
- Audio Technica AT2020 (Medium Range Condenser)
The Audio Technica AT2020 has been the gold standard for streaming microphones since its release in 2004. Users love this mic because not only is the sound quality great, but the foldable design makes it easy to carry.
The Blue Yeti is a favorite because of its large-diaphragm condenser mic and multiple directivity settings. It is quiet enough to catch your every breath while positioning it in front of you.
In addition, entry-level mics like the Blue Snowball are also great.
Cameras/web cameras.
You can use your laptop's built-in camera or dedicated capture cards linked to high-end cameras, or you can make do with a DSLR. I recommend using simple webcams that don't require complicated setup.
Popular options include the Logitech C920, Razer Kiyo, and Logitech Brio.
The lighting.
Powerful lighting is essential for quality streaming. The lighting should also be consistent across the streaming area to give viewers a clear and clear image of your face and your game.
Digital cameras alone won't give you the best results if your room has low light. Instead, use natural lighting to give your flow a warm glow.
Some people use white lamps with built-in reflectors underneath, and others replace their windows with plexiglass panels. LED light boxes are also a great choice.
Stands/Supports.
Those who want to stream from their computers rely on cameras that they can mount on a tripod.
Frames can be selected from the following options:
- Desk stand: RODE PSA 1
- Desk Stand: Gator Frameworks Short Weighted Base Microphone Stand
Additionally, you may also need a green screen to broadcast on a wide range of different backgrounds. You can make any location your personal channel, and people who follow you won't have to stream you from your bed.
You'll also need a headset, a reliable Internet connection, dual displays, graphics cards (like the Nvidia 1660 Ti), and more.
5. Personalize your channel.
Before you start streaming, you need to set up your account and customize certain elements of the channel.
Start by defining your feed title, category, and notification.
You can make all of these changes from the Settings option on your dashboard.
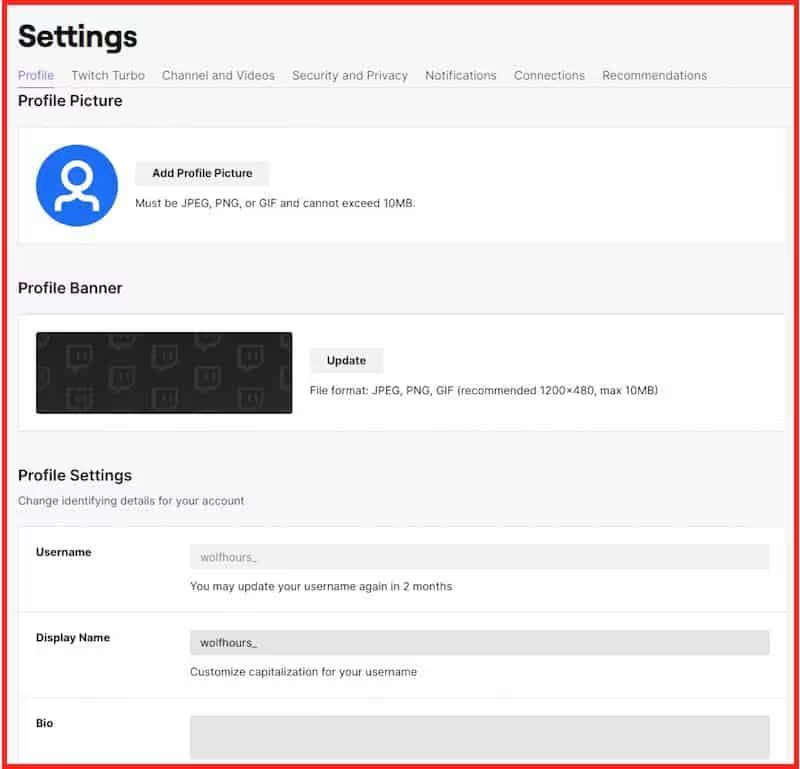
When you personalize your channel, new viewers will know who you are when they discover you.
You can change your profile photo and bio from your smartphone or computer. You can also customize several additional settings through your web browser.
Be sure to add an attractive banner and a few panels. This will allow your viewers to better understand what you are going to stream.
Additionally, it can help you to redirect viewers outside of the Twitch platform with external links.
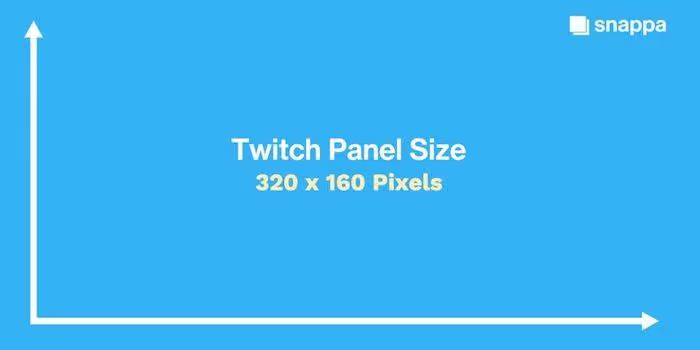
As for the size of the panel, do not exceed 320 x 160 pixels.
Here are some of the best panel manufacturers you can choose from:
- Nerd or Die - It's a free panel creator that offers lots of Twitch panel templates and designs. You can customize colors, icons, fonts, text, and sizes. It is also easy to use but requires pre-installation.
- Snappa - This panel creator offers over 4,000,000 templates. You'll also be able to design Twitch banners, YouTube thumbnails, video arts, and more.
Broadcast on Twitch.
Now that everything is in place, you can finally start airing your shows. You can stream live from your Mac/PC desktop or laptop, smartphone, or web browser.
1. Stream from your Twitch account using a Mac/PC desktop.
Start by downloading streaming software like Twitch Studio (PC/Mac), XSplit, or OBS Project (PC/Mac) to provide your audience with superior audio quality.
I use OBS Project to demonstrate the live-streaming process on Twitch.
Start by downloading OBS from Obsproject.com.
After installing OBS, the first step is to get your “Stream Key” back on your Twitch account. This is a unique code that you'll need to enter into OBS to link it to your Twitch channel.
You can easily find it in the “Settings >> Stream” option on your creator dashboard.
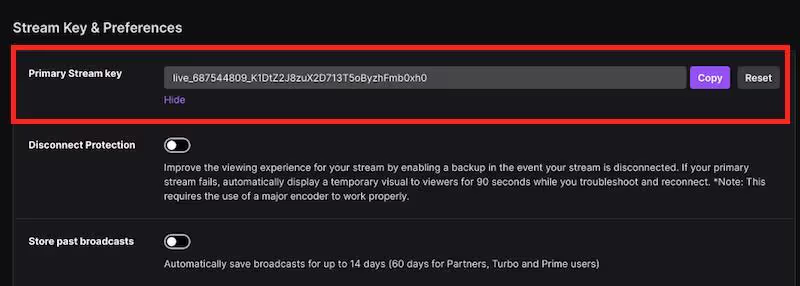
Copy your flow key to paste it later into the OBS settings.
Note: Don't share your key with anyone. Anyone with your streaming stick can stream on your channel.
Now go back to OBS.
Select the “Settings” option, then “Stream,” and finally select Twitch from the dropdown menu. Finally, paste in your streaming key.
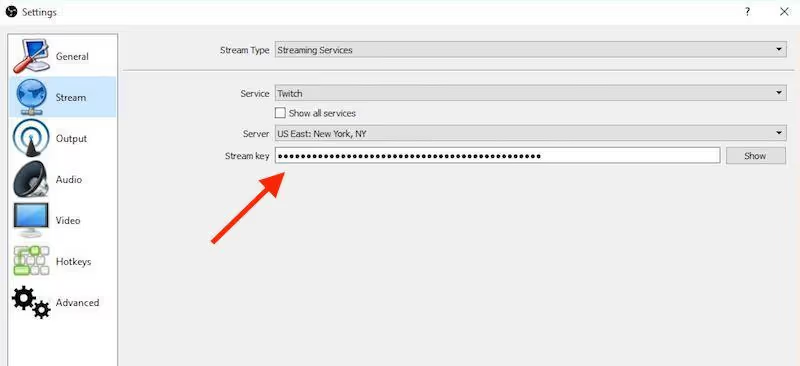
Now OBS will be able to show your stream to your audience.
However, you need to set up your OBS first.
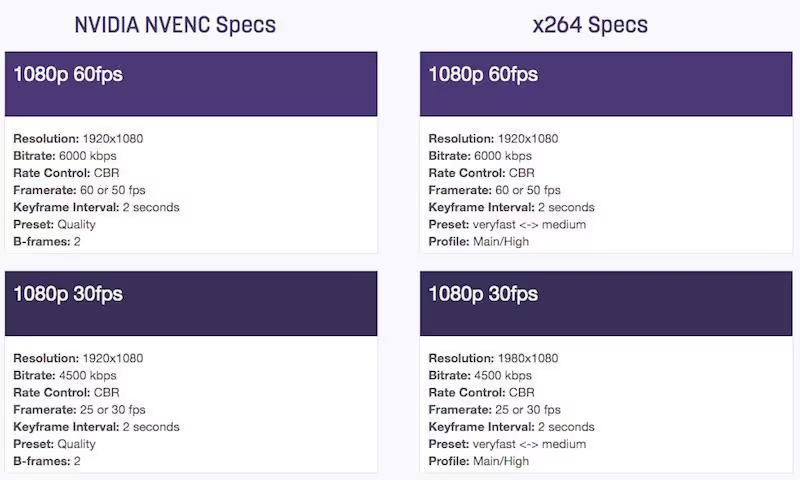
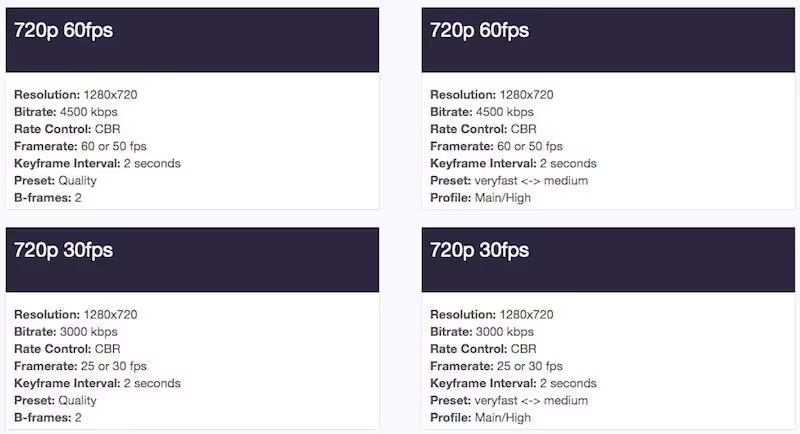
First, you need to specify the bit rate you want to use for your video stream. The higher the bit rate, the better the quality of your video will be. However, this will also require a higher upstream connection.
You can use this table to determine coding, bit rate, resolution, and frame rate parameters to achieve the right balance.
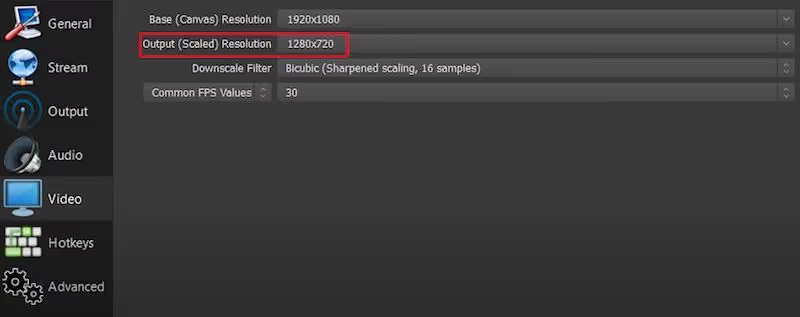
Then, enter the base resolution (the one at which you're running your stream) and the output resolution (the stream resolution) in the Video tab.
Now, change the configuration of the Audio tab, just above the Video tab.
Here, set your sample rate to 48kHz and specify which speakers and microphone you want to use.

Once you've completed these broadcast settings, it's time to set up the scene that your users will see.
Now you need to set up three essential items:
- Your webcam
- The show or game you're streaming
- Audio from your microphone
We're going to create a “Source” for that.
Click on the “+” icon on your main OBS window. It will be a part of the window that you are going to broadcast.
Here you will have different options for different types of flows:
- Screen capture - to capture the entire screen (but not a game).
- Game capture - to capture games in full screen.
- Window capture - to capture a specific application that you are using.
Then, select a capture mode that suits you and choose OK to add the source.
For example, if you're broadcasting a live game, rotate the game window and select Game Capture. Drag the game to take up the entire screen in the main OBS view.
Then, set up your webcam by returning to the “Sources” list and selecting the “Video Input Capture” option. Finally, specify which webcam you are using.
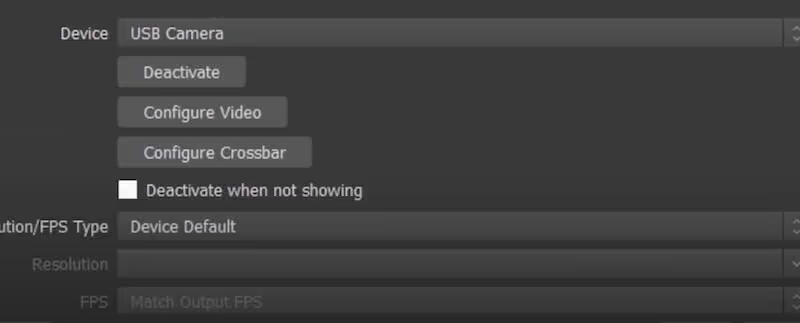
Now you're ready to start streaming.
However, I recommend that you test your microphone, audio levels, and other settings first. Make sure your audio levels are not too high or too low.
You can also adjust the sliders under the “Blenders” option to review the settings. Finally, start recording to make sure everything is as you want it to be.
These are the basic OBS settings. You can also check out this A detailed guide to stream on Twitch with OBS.
You can also use Twitch Studio to set up your feed and put it online quickly. The platform has a Twitch Studio tutorial that will guide you through the process of setting up your webcam and audio inputs.
You can also opt for the Streamlabs OBS software to connect your Twitch account and set up your stream. The platform also offers a short tutorial.
2. Streaming using the Twitch app.
To stream live from your smartphone, download theTwitch app for iOS or Android.
Then, log in to your account and click on your profile icon in the top left corner of the app.
Finally, click on the “Go Live!” button to start the broadcast.
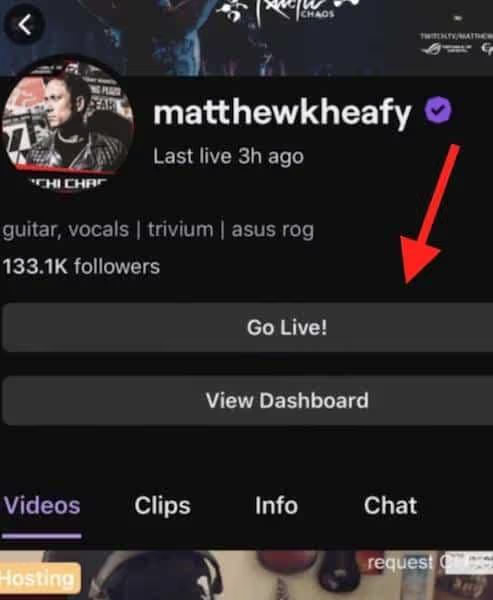
It's the fastest way to live stream with Twitch, and you don't need any special hardware or software equipment either. Your phone's camera and microphone are all you need.
You can also opt for Dolby On for iOS or android to improve the audio quality of your live stream on your phone. Dolby On is a free recording application based in the United States and equipped with Dolby audio technology.
To start streaming, sign in to your Twitch account and sync it with the Dolby On app. Finally, start streaming by clicking on the Go Live button.
Integration with Dolby On will improve audio, noise reduction, and dynamic equalization. Keep your phone with the Twitch app or your computer handy so you can interact with your community and respond to chats simultaneously.
3. Stream on Twitch from your web browser
You can also stream live without installing additional software from your web browser thanks to Lightstream Studio. Lightstream lets you invite guests to your live show with just a few clicks.
Go to the Lightstream site, sign in with Twitch, and authorize your account.
Then, select the option you want to stream. You can stream games from Xbox, Playstation, or your computer.
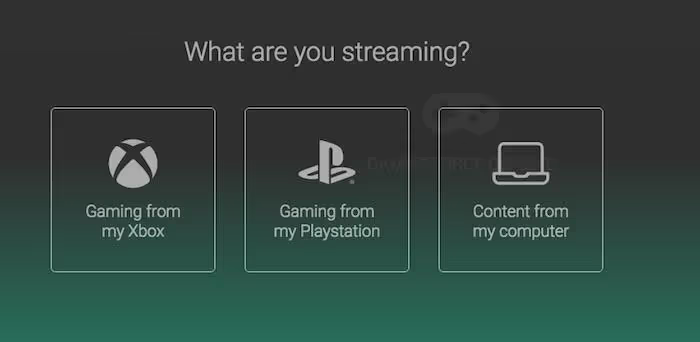
You'll get a step-by-step tutorial that will guide you through the process of adding your camera and audio source. Check “turn off music source processing” to get high quality sound.
You can then navigate to the top right corner and click the “GO LIVE” button to start streaming.
Additionally, you can also stream the gameplay of your Xbox and PlayStation 4 of the current generation.
Increase your audience.
Whether you're a beginner or an experienced streamer, there's always room for improvement. If you are looking to improve your performance and develop a community of loyal followers, you need to contribute your own.
There are so many different ways to improve — from adjusting your channel to promoting your feeds and getting feedback from the audience.
Here are some tips that will help you increase your number of viewers and establish yourself as a promising broadcaster.
1. Advertising and charity.
With millions of daily active users, Twitch is an ideal platform for advertising.
Many viewers also support causes they believe in and are open to advertising on the platform because the ads support their favorite broadcasters.
Twitch is a market-oriented platform where:
- 62% of viewers are interested in extreme sports and video game celebrities on a daily basis.
- 70% offer financial support
- 64% buy products recommended by them
That means you can place ads in different niches and offer targeted ads to engage your viewers.
You can also undertake philanthropic initiatives on the platform. This will provide your brand with a unique opportunity to participate in something that your audience cares about.
And it's common for streamers to raise millions of dollars for charity through their stream.
2. Build partnerships with brands.
Brands can advertise on Twitch by partnering with a streamer with a loyal fan base. So once you have enough viewers, you can start partnering with brands to promote their products and, at the same time, increase your number of viewers.
You can include the brand in the title of a sponsored feed or in the title of its channel page. You can also mention the brand organically by bringing it up during the flow when a relevant event occurs.
For example, Totino's Pizza once partnered with creators on Twitch. Les streamers were promoting the brand by eating pizza rolls on the stream after each win.
Partnering with famous brands also helps you establish your authority in the sector.
Viewers react quickly as soon as a brand is mentioned in the feed. The brand can also track the impact of streaming on traffic, especially if your stream is scheduled.
Businesses typically contact influencers directly or through their sales managers to find partnership opportunities.
3. Identify the best streamers in your niche and imitate them.
It's not easy to stand out on Twitch with so many people who have the same setup as you. You also need to compete with lots of high and mid-level streamers to make your mark.
And you don't even need to do something completely out of the ordinary to increase your audience. You can simply identify the top influencers in your niche, see what they are doing, and try to understand why they have a massive audience.
Use Twitch API data to identify the top 10% of streamers. It uses various measures, including simultaneous viewers or channel followers.
Because people stream on Twitch from all over the world, peak times vary depending on where they are.
You can extract this data using the API and use it to your advantage. Additionally, you will be able to find out which are the most popular games on the platform.
Once you're up to speed with all of the competitor information, you can take advantage of it to emulate the best success strategies of the top streamers in your field.
4. Choose the best tools and plugins to create your community.
From analytics and sound alert tools to donation plugins and sponsorship tools, you can sync your Twitch account with numerous tools to grow your channel.
Sound alerts: Community engagement tool.
Sound alerts are Twitch's built-in community engagement tool. Viewers can play a variety of sound effects on your stream, allowing them to cheer you on as you stream.
It also allows you to download your own collection of sounds. The “Bit amounts” function for audible alerts allows you to thank your donors. Such gestures promote familiarity and give your viewers the feeling of being recognized.
This could result in word-of-mouth promotion, helping you gain more viewers.
Audible alerts also come with overlay and chat notification functions.
Moobot: Automation tool.
Moobot is a tool Smart bot that can help you automate several tasks related to managing your channel.
Here's what Moobot can do for you:
- Share your social media accounts with viewers in chat.
- Suggest scripted messages about sponsors.
- Listen to viewers' song requests.
- Conduct community surveys.
- Organize your contests on your behalf.
- Have the robot repeat any important messages to your viewers.
Here is an example of a custom chat order given to Moobot:
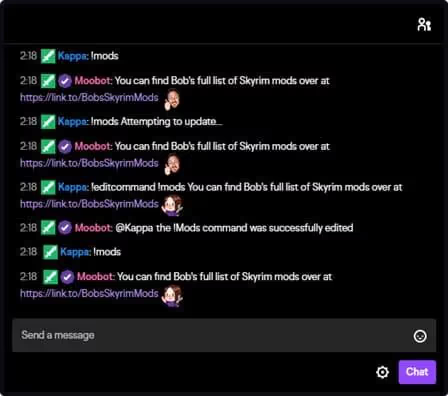
The tool focuses on growing the community by promoting the engagement and loyalty of your subscribers and viewers.
SullyGnome: statistical and analytical tool.
Thanks to theSullyGnome statistics and analysis tool, you can gather information about streamers. It shows various categories including the most watched channels, the most watched games, the fastest growing channels, the most viewed streams, and more.
This information will help you grow your channel by staying up to date with what's going on in the Twitch circle.
TipeeeStream: Payment plugin.
TipeeeStream allows you to accept donations via PayPal, credit card, and Bitcoins, helping you to grow your chain by monetizing it. The tool will also show personalized alerts on the screen for donations and subscriptions.
TeeBoard: Twitch Desktop Plugin
TeeBoard is a great plugin for streamers using the desktop version of Twitch. It will help you define the status of your channel, visualize your broadcasts and highlights, launch ads, and much more.
You'll also find several functional widgets, including:
- Notifications for new followers and donations.
- A clock with the possibility of setting an alarm
- Countdown functionality.
- A live chat function.
- A poll widget.
Monetize your flows.
If you're a streamer, you can maximize your success by monetizing it. Twitch allows you to do this through its affiliate program, sponsorships, and more.
Here are all the monetization options for earning money with your streams.
Earn money.
When you're just starting out, you won't be able to make money with Twitch Bits, subscriptions, game sales, or ads. To do this, you'll need to become a Twitch affiliate or partner.
Also, it's nearly impossible to make money from referrals or merchandise unless you have a large number of followers.
However, there are ways to make money on Twitch without being a partner.
Here's how:
1. Donations.
Many viewers are ready to support their favorite streamers by making monetary donations. You can accept them through a third party service.
Here are a few ways you can get donations from your viewers:
- Add a donate button to your channel using services like PayPal, Streamlabs, or Donorbox.
- Add a donation panel to the “About Me” section of your profile.
- Promote your donation link in chat using Moobot to make it easy for users.
Additionally, you can also encourage viewers to donate by having them buy services on an ongoing basis.
2. YouTube.
You can upload the best parts of your streams to a YouTube channel and start earning a bit of money from YouTube ads. Here is a list ofalternatives to YouTube where you can also monetize your content.
Uploading videos to YouTube is also a cross-channel promotion strategy since you're sharing your content on a new social media channel. This will help you attract new followers to your feeds.
3. Patreon.
Once you've acquired a few regular viewers, you can encourage them to donate to you monthly on Patreon.
In exchange, you can provide them with valuable content or offer them rewards that you create.
4. Affiliate marketing.
Sharing affiliate links can also allow you to earn money without becoming a partner. Don't mistake that for becoming a Twitch affiliate, though.
Amazon Associates is a popular way to make money through affiliate marketing. This program involves creating links to products on Amazon and earning a commission every time your visitors make a purchase.
You can even promote your affiliate links in your social media profiles, during streams, and within the chat via a chatbot.
Get paid as an affiliate.
By becoming a Twitch affiliate, you'll have access to three other monetization options: subscriptions, Twitch bits, and game sales. You can take advantage of the first two options even if you don't sell games.
To become an affiliate, you need to have at least:
- 50 followers.
- Five hundred minutes of broadcast in the last 30 days.
- Seven days of broadcast.
- Three or more simultaneous viewers on average
Here's a quick overview of these three affiliate programs:
1. Subscriptions.
This program allows you to provide premium content in exchange for a paid subscription from your subscribers. You can offer multiple subscription levels: $4.99, $9.99, $24.99, and the freemium plan.
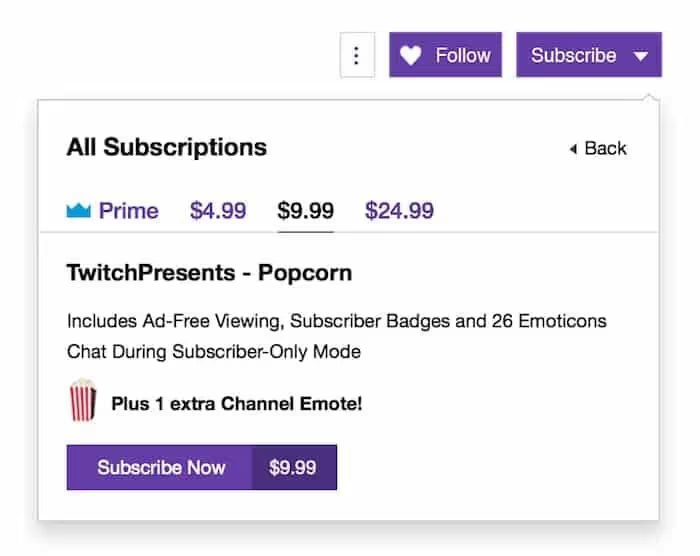
Subscription bonuses include subscriber-only feeds, exclusive chat rooms, unique emojis, and merchandise discounts.
2. Twitch bits.
Bits are direct donations that you accept when you become an affiliate. Viewers buy the Bits or earn them by watching ads or completing surveys.
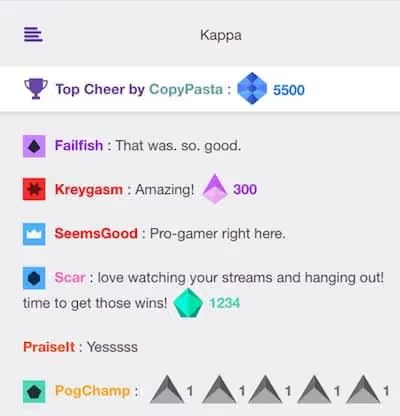
In fact, bits are virtual encouragement or advice that viewers give to streamers in chat to support them. As a Twitch affiliate, you get $0.01 for each bit.
Earn revenue with a big audience.
Once you gain a significant audience, the process of making money will become easier. In addition, you can earn a bit more money in two other ways:
1. Brand sponsorship.
You don't have to become a Twitch affiliate or partner to land sponsorship contracts (although that's a bonus). Twitch allows you to promote all types of brands and products to your audience.
All you need is an engaged audience big enough for brands to reach out to you on their own. You can also present your proposal to brands directly.
You can also partner with services like HelloGamers which sets up sponsorship agreements between brands and streamers.
2. Sell your merchandise.
Once you have an engaged fan base, some of your viewers might be ready to buy your merch products, such as cell phone cases, T-shirts, stickers, mugs, and more.
It's a long process, though. First, you'll need to have your products made, printed, and shipped. Next, you'll need to create a Shopify store and set up payment options.
You can also eliminate the entire manufacturing, pricing, and shipping process by using all-in-one print-on-demand platforms like Printful.
When it comes to designing the graphics, you can then use tools like Hatchful or Canva. Another option is to hire a designer on platforms like Fiverr.
Earn money on Twitch as a partner.
Once you're a highly successful Twitch affiliate, you can join the Twitch Partner Program.
As a Twitch partner, you get all the benefits that are offered to affiliates. One of these benefits includes a share of the advertising revenue generated by their feeds.
Before viewers join a stream, pre-roll ads appear on Twitch. Partners can also trigger mid-roll ads at any point during the stream.
These ads are generally worth between 0.002 and 0.01 dollars per view.
What do I need to start streaming on Twitch?
To stream on Twitch, the first thing you need is a Twitch account. To get a Twitch account, go to their website and register as a user.
Then, download one of the many streaming software programs available and install it on your computer or laptop.
Then create a broadcast using your new streaming software by selecting the broadcast location and the items to be broadcast (webcam and audio). Before starting the broadcast, make sure that everything is connected properly and that all necessary settings are in sync.
Can you make money streaming on Twitch?
Yes, there are a number of ways you can make money streaming on Twitch.
The easiest way is to share revenue from native advertising on the platform.
Other methods include selling your own products, digital products, and product placements for brands.
How do I start streaming?
Before streaming, create an account on Twitch and download the software to your PC or Mac.
In principle, a streaming installation consists of two components: a video to capture the broadcast content and a place to place that content so that it can be seen by peers.
It can be as simple as a webcam with Skype (free) or Apple FaceTime (free), but for those who want greater control over their streaming, more complex setups are available; there are plenty of free and paid programs that allow you to record footage from multiple sources.
Summary.
Streaming on Twitch is a fun pastime that anyone can get started with. While streamer success is not infused science, it does require skill and hard work.
Start by setting up your account and choosing the right equipment. You also need to broaden your flow, incorporate new publishing skills, and create a community.
It's also critical to monitor what's working for your competitors and then decide how you can best optimize their strategies.
Then comes the last part: growing your audience and monetizing your feed.
What do Ninja, Shroud, and Lirik have in common? These are some of the best streamers on Twitch.
They also succeed in engaging viewers and monetizing their content through numerous means, such as sponsorship and creating products (like merchandise or books).
You can also do it by taking the right step-by-step approach.

.svg)


