Scheduling a Zoom meeting
To schedule a meeting Zoom.us, consider the different means and interfaces that you can use to plan your session.
The most common are using the Zoom desktop application or the web portal.
Using Zoom Desktop (Windows/Mac)
If you want to use the desktop client to schedule a meeting, follow these steps:
- Access your Zoom account on the desktop client.
- Select the Scheduling icon.
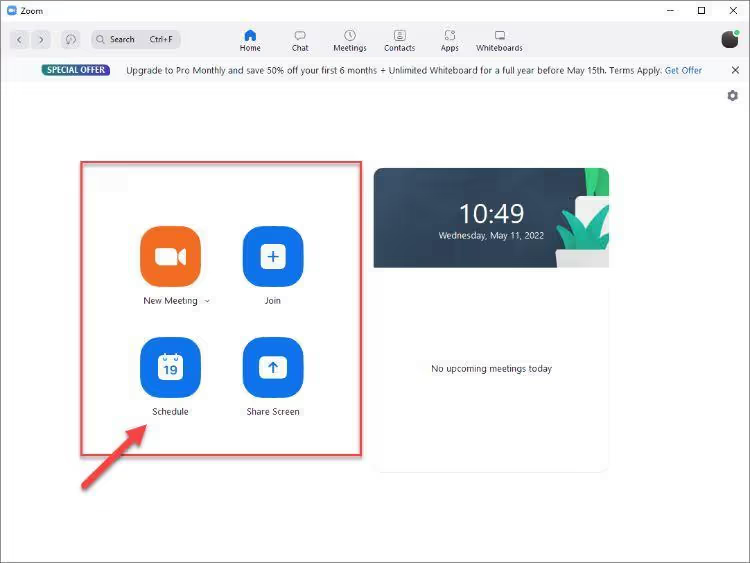
- Choose your meeting settings, including date and time, security, video, audio, advanced options, and more.
- Finally, click Save to finalize the process.
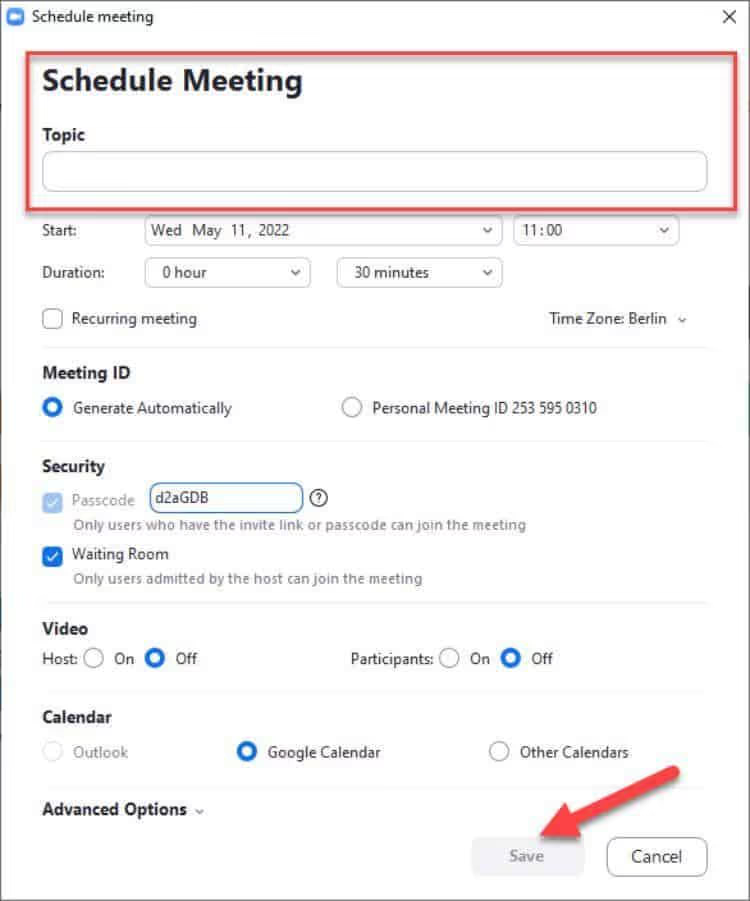
You can also set a recurring meeting from the menu if that's what you need.
Use Zoom on the web
Another way to schedule a meeting is through the web client.
The Zoom desktop client does not need to be installed on your system as you can use your web browser to organize the meeting.
To set up a scheduled meeting using the web client, follow these steps:
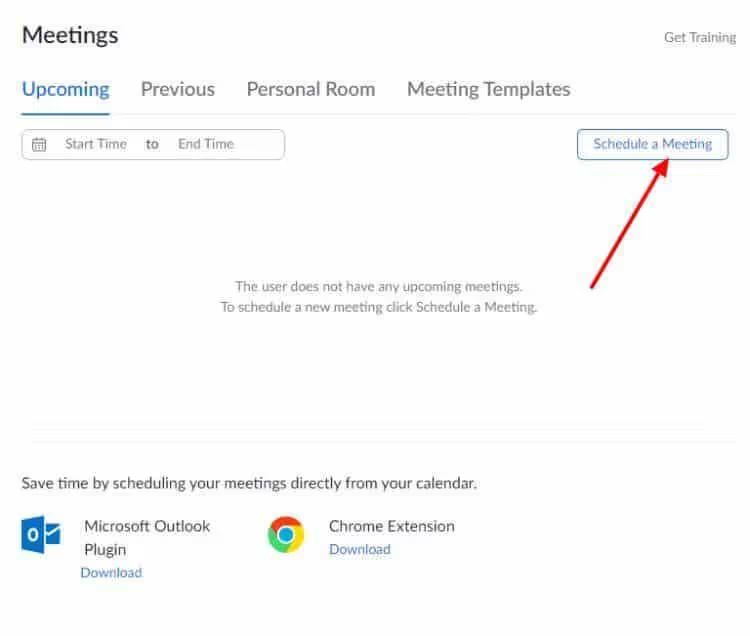
- Log in to the web portal
- Click on Schedule a meeting
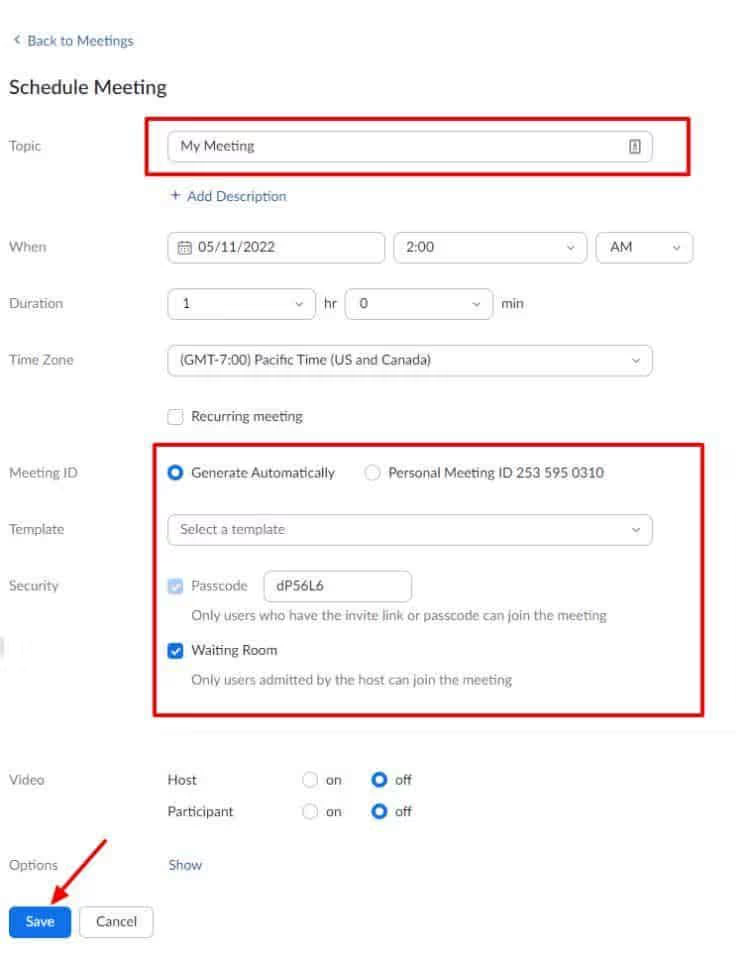
- Choose required meeting options
- Finally, click Save to complete the process
Other ways to schedule a meeting
The benefit of Zoom is that it integrates with both Android and iOS when scheduling a meeting.
You can use the respective mobile applications to schedule a new meeting and invite participants without much difficulty.
It also integrates with many popular applications like Google Calendar, Apple iCalendar, and Microsoft Outlook.
That means you can easily schedule a meeting from these apps without needing to open the Zoom app separately.
Additionally, there are also plugins for some of these applications that make programming even more accessible.
Programming from the Outlook add-in
You can install the Outlook add-in to schedule a meeting directly from this email application.
Just make sure you're granting the correct permissions so you can schedule a meeting from Outlook itself.
To install the Outlook add-in, follow these steps:
- Access the Office 365 admin portal
- Click Settings, then choose Integrated Apps.
- Tap on Get apps
- In the search bar, search for Zoom for Outlook, then click Get Now.
- Accept the terms and conditions and then click continue.
- Click on Next
- Define how you want the add-in to be used in your organization.
- Click Next, then select who will have access to the add-in.
- Click Save and then Close.
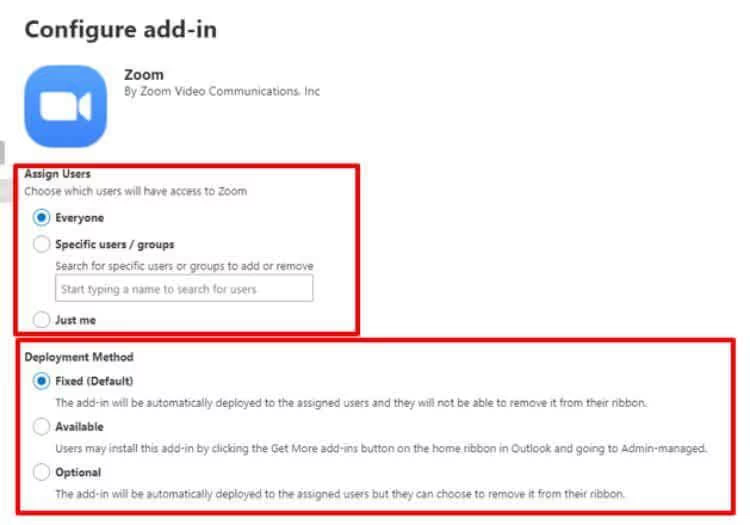
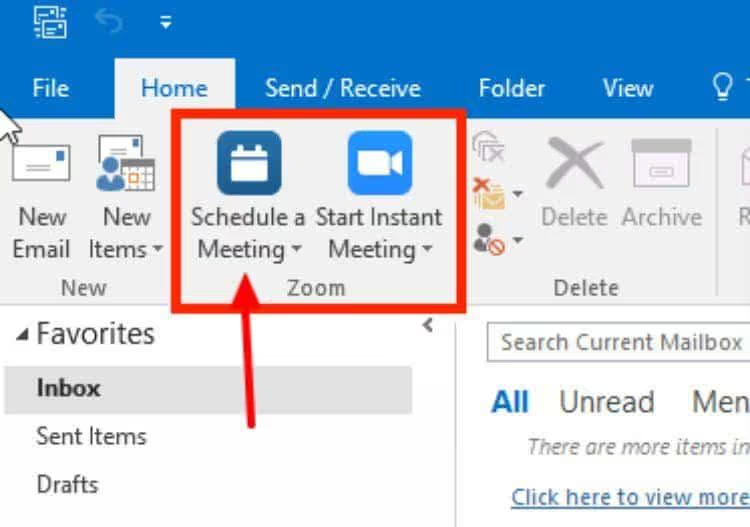
After you schedule the Zoom meeting, it will be added to your Outlook calendar so you can share it with others and remind yourself when the meeting takes place.
Programming using the Chrome Google Calendar extension
You can add the Zoom Scheduler directly to your browser using the Chrome Web Store.
You can use the extension to schedule a zoom meeting without leaving Google Chrome.
After signing in to Zoom, you can schedule a meeting and set the options you want.
Various options that you can set when programming
Earlier, I covered a few options that you can set when you're scheduling a meeting, but there are plenty to choose from when you're scheduling a Zoom meeting.
These are some of the options that you have.
1. Topic
It is quite explicit, but it is good to specify that the subject of the meeting should be the title of what you are going to talk about.
It's a good idea to discuss the topic briefly and to the point so that participants know what it's about before they join the meeting.
2. Date and time
This is where you set the date and time of the meeting.
You can also choose whether it's a one-time meeting or a recurring one.
3. Duration
That's how long the meeting lasts.
When scheduling meetings, you can choose from a list of predefined durations in 15-minute intervals.

4. Time zone
This is the time zone in which the software will set the meeting time.
By default, it will use the time zone of the person who is scheduling the meeting, but you can change it to a different time zone.
This is important to consider if you have people reaching you from different time zones.
5. Recurring meeting
If you want to schedule a recurring meeting, you can select how often it will take place.
You can choose daily, weekly, or monthly intervals.
6. Enrollment
If you want to require registration for your meeting, you can enable this option here.
This will allow you to gather information about the meeting from the people who register for it, such as their name and email address.
7. Calendar
This is where you choose who the meeting is for.
You can choose from a list of people or groups that you've previously created.
8. Meeting ID
This is the unique ID for your meeting.
By default, it will be generated automatically, but you can choose to set your custom ID if required.
8. security
This is where you can set security options for your meeting.
You can require a password to join the meeting or allow waiting rooms to screen participants before they enter.
9. Video
Here, you can choose whether Zoom will enable video for the meeting.
You can choose to turn it on or off by default, or allow participants to turn it on or off during the meeting.
10. Audio
This is where you can choose whether Zoom will enable computer audio for the meeting.
Audio is on by default in most meetings, but you can turn it off if needed.
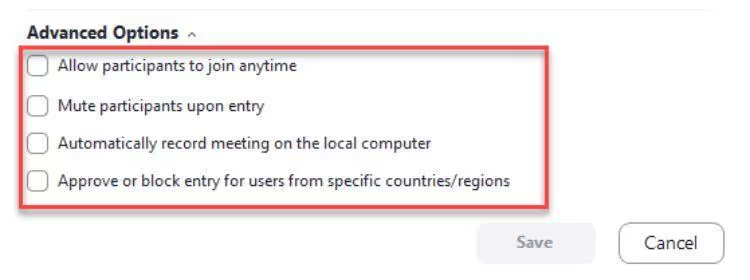
11. Advanced meeting options
This is where you can enable or disable other meeting options by checking/unchecking the box on the right.
You can choose whether attendees can join at any time, whether attendees enter the meeting room mute, whether the meeting is automatically recorded, and whether specific users should be blocked to access the meeting.
Zoom meeting content
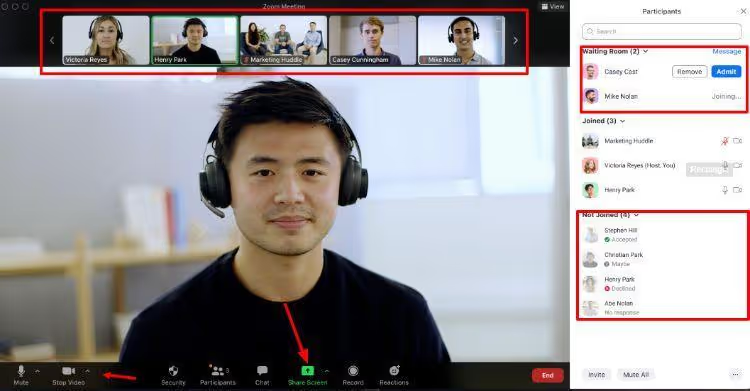
When you join a Zoom meeting, you'll see the following interface:
Waiting room
The ability to activate a waiting room is available for all Zoom users.
When a participant clicks on the personal meeting ID and enters the waiting room, the host can admit the participant into the meeting by clicking “Admit.”
The host also has the option of muting participants as soon as they enter.
Scheduled meetings admit all participants at the start time of the meeting.
Send a meeting invitation
You can use the invitation link to invite participants to your scheduled meeting.
The Share button will open a new window with the meeting link and the meeting code (if required).
You can also invite participants via email or social media platforms.
Mute participants
If one or more participants are disrupting the meeting, you can mute them.
Click on the “Mute” button next to their names in the “participants” list.
Sharing screen
Host and participants can share screens.
To do this, click the “Share Screen” button at the bottom of the Zoom window.
Recording meeting
If you want to record the meeting, click the “Record” button at the bottom of the window.
The audio and video recording then starts.
You can stop the recording by clicking on the “Stop Recording” button.
You can save the recording locally on your computer or even in the cloud (this is an option for paying subscribers).
Chat
You can use the chat function to send messages to all participants or to specific people.
To do this, participants can click on the “Chat” button at the bottom of the window.
Departure meeting
When you're ready to end the meeting, click the “End” button at the bottom of the window.
You'll be asked to confirm that you want to leave the meeting.
Once you confirm, you will be disconnected from the meeting.
Summary.
Knowing how to schedule Zoom meetings is a valuable skill in today's world.
While many people use remote desktop software and access tools to work from anywhere in the world, it's more important than ever to connect with others through video conferencing.
Additionally, understanding the various Zoom meeting settings and options is critical to ensuring your meetings run smoothly.
By following the steps in this guide, you'll be able to schedule and host a Zoom meeting like a pro.
Further reading: When it comes to video conferencing software, there are tons of alternatives out there.
Here you go How to choose video conferencing software adapted to your needs.
Additionally, if you want to take video conferencing to the next level, check out the webinar software platforms the most popular currently.
.svg)


